Glass is timeless and there are so many uses to cake stands that go way beyond just holding a cake.
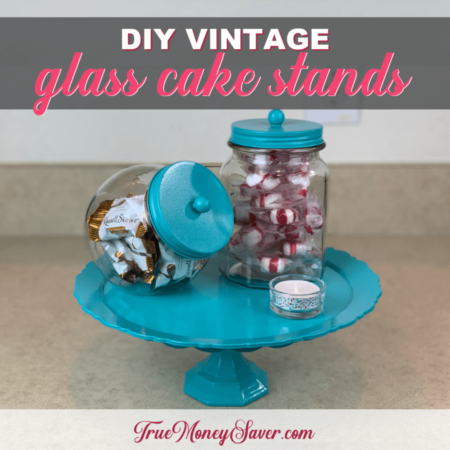
But who wouldn't want a big, beautiful chocolate cake on a vintage glass cake stand coming through their door?! I know I would!
As I was trying to think about who I was gifting to this year, these cheap cake stands just came popping back into my mind.
My grandmother, who we lovingly called Mom-Mom, collected milk glass (that's the opaque white glass) so every time I see a while opaque piece of glass, whether it's a cake plate or a platter they remind me of the fun days of my past when I'd stay at her house during the summer.
Since I have already made a couple before, I know I could make them for pretty cheap. And since the drying time is the only hard part about this project, I knew it was super simple too.
And they make a great gift! I'll let you in on all the ways you can dress them up below.
I love making these vintage glass cake stands because you can use them for gifting, displaying, and even organizing. And as a mama, you know that's a constant chore.
This post is part of our 30 Days of Homemade Gifts Series. 30 gifts that are easy (and cheap) to make, but also something you’ll be proud to give.
Each Homemade Gift has to meet 5 stipulations in order to maximize your money and make it easy for a busy mom to do:
- Easy to obtain supplies – Supplies are things you might already have on hand or are easy to find at Walmart or a craft store so you can get them in the same day you want to make it.
- Easy to make – Supplies are easy to work with or use so that anyone could do it… not caustic… so you could do the craft with your kids.
- Quick to make – It can be made in 30 minutes or less so it’s possible to make this gift in the middle of the night with products you most likely already have on hand. (Note: The 30 minute guide is your “hands on” time, dry time is excluded. This project takes extra drying and baking time.)
- Cheap to make – You should be able to make the project without spending more than $10.
- Substantial – Each gift is “big” enough that you'll feel confident giving it alone and not having to add a gift card to it.
BONUSES:
Multiple uses – Multiple gifts can be made out of the same supplies giving you options to use up all the supplies you buy.
Saving Money Double Bonus: Try to think about what you already have on hand to upcycled and save more money.
So let's cross one more gift idea off our list this year by making this DIY easy cake stand!
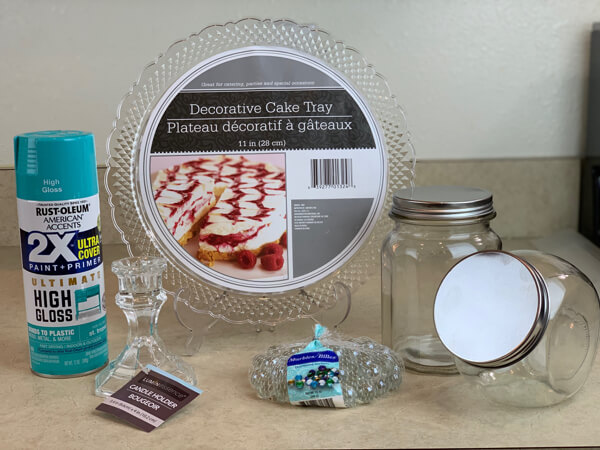
Supplies For Vintage Glass Cake Stands:
In this post I'm showing you two options, depending on how much you want to spend or what you've got in mind when you use it.
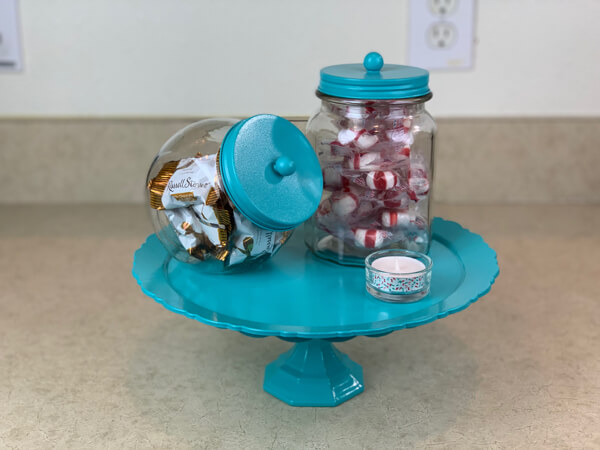
Option 1: Cheaper but not as sturdy, plastic & glass cake plate
- 1 – Plastic platter – $1 (@ Dollar Tree)
- 1 – Glass Candlestick $1 (@ Dollar Tree)
- Spray Paint that works on Glass and Plastic (I used Rust-Oleum in St. Tropez color from Walmart $3.96 each)
- Plastic glove if you want to protect your hand and arm to hold items when you spray paint
- Ruler or tape measure and marker, pencil, or tape to mark center of plate (Optional, I just “eyeball” it)
- E-6000 Adhesive 3 oz – $3.97 (@ Walmart)
- Paper towels for wiping excess glue
- Cardboard for painting surface (make sure to paint in a well ventilated area)
- Glass cleaner or alcohol to wipe any fingerprints off before you paint
BONUS FREE DOWNLOAD
Save Money On Your Craft Supplies
Download this FREE Guide to find 25 Ways to save money when you buy craft supplies so that your beautiful creations cost less.
Save Money On Your Craft Supplies
Download this FREE Guide to find 25 Ways to save money when you buy craft supplies so that your beautiful creations cost less.
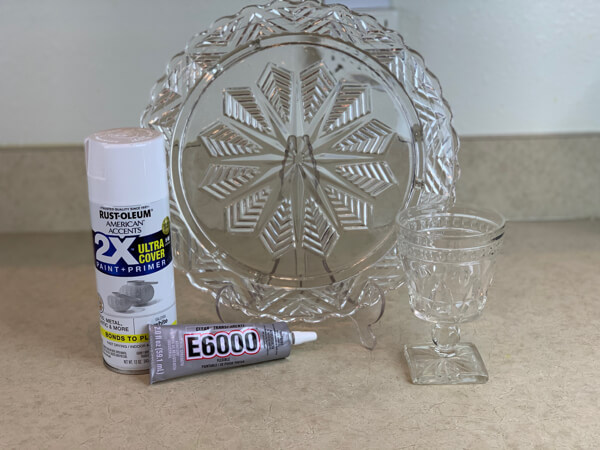
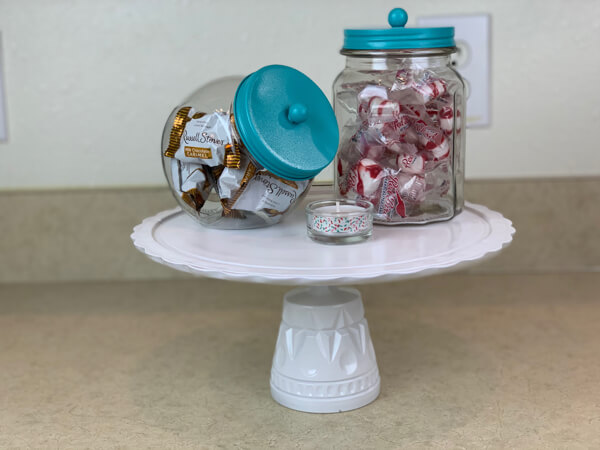
Option 2: Sturdier, more substantial vintage glass cake plate
- Vintage glass platter or plate – $2.98 – $3.98 (@ Goodwill or Thrift Store)
- Vintage goblet, glass or candlestick (you only need one so look for singles) $2.98/4 pk @ Goodwill Thrift Store or $1 @ Dollar Tree
- Spray Paint that works on Glass and Plastic (I used Rust-Oleum Gloss White from Walmart $3.96 each)
- Plastic glove if you want to protect your hand and arm to hold items when you spray paint
- Ruler or tape measure and marker, pencil, or tape to mark center of plate (Optional, I just “eyeball” it)
- E-6000 Adhesive 3 oz – $3.97 (@ Walmart)
- Paper towels for wiping excess
- Cardboard for painting surface (make sure to paint in a well ventilated area)
- Glass cleaner or alcohol to wipe any fingerprints off before you paint
NOTE: if you are concerned about using your cake plate for an actual cake (Mmmhmmmm) then you might want to add a coat of food safe shellac on the top plate right over the paint. This one is FDA approved to be food-safe (and can be used over paint).
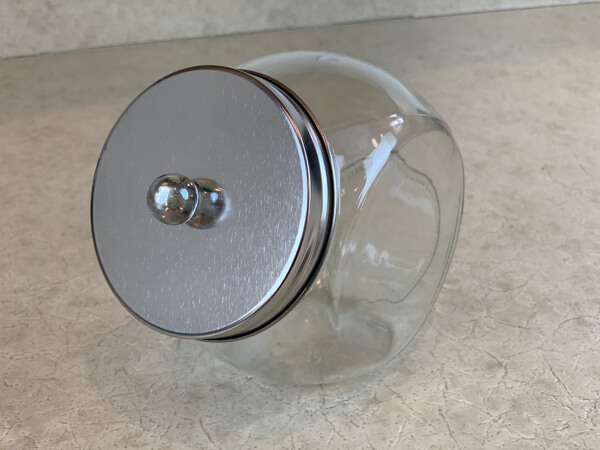
Optional Candy or Supply Containers
- 2 – Glass Containers with lid $1 each (@ Dollar Tree)
- 2 – Marbles (dig around and see if you can find two marbles, so you don't need to buy a whole bag of them) – $1 (@ Dollar Tree)
- Spray Paint that works on Glass and Plastic (I used Rust-Oleum in St, Tropez color from Walmart $3.96 each)
- Ruler or tape measure and marker, pencil, or tape to mark center of lid (NOTE: I do NOT “eyeball” it for this item)
- Scissors or other pointy object to poke a dent in the lid
- E-6000 Adhesive 3 oz – $3.97 (@ Walmart)
- Paper towels for wiping excess
- Cardboard for painting surface (make sure to paint in a well ventilated area)
- Glass cleaner or alcohol to wipe any fingerprints off before you paint
First, go thrifting! This project can be done so cheaply when you find great deals at your local thrift store. Find out when your local thrift store has deals and also check out their Facebook pages for sales updates.
You can find beautiful platters, bowls, other trays, and vintage glass items at your local thrift or antique store to make these cheap cake stands. Use your imagination to fit what you want or need for gifts.
Of course, you may not find the same prices I found, but I wanted to give you an idea of what can be found. Check out your local thrift stores for possible deals and keep looking! They get new stuff in all the time.
Since there are many options that you can use this technique for, dream and create your own unique gifts.
This DIY easy cake stand will take no time at all to make.
Directions To Make Vintage Glass Cake Stands:
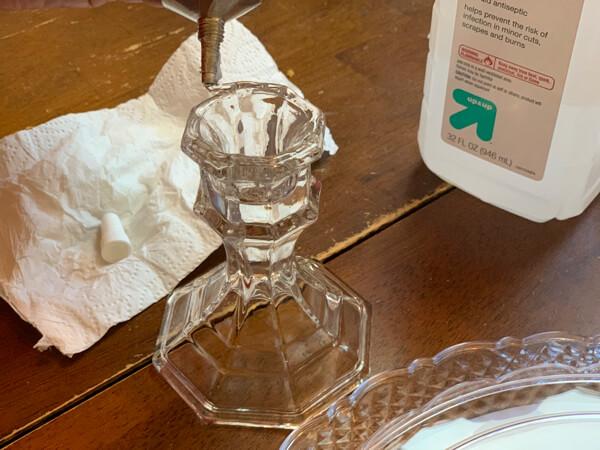
Step 1: Glue Your Easy Cake Stand Together
If you bought the vintage glass plates and goblets to use for your cake stand then you'll want to wash them before you get started.
If you are using the plastic cake plate then you might need to use this simple 2-ingredient adhesive remover to get the price sticker residue off.
Use glass cleaner or alcohol to wipe any finger oils off them once their dry.
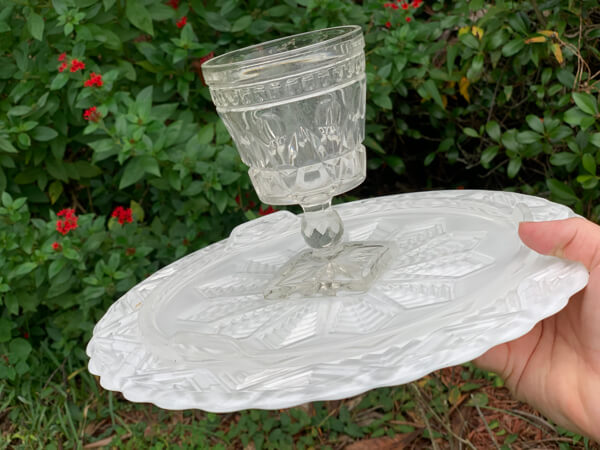
Carefully run a bead of E-6000 glue on the goblet/glass/candlestick. Making sure you are actually gluing the section that will connect to the tray.
According to instructions, you do not necessarily have to work super quickly, you can wait up to 2 minutes after the glue has been applied to press the surfaces together.
That means you'll have some wiggle room in case you need to move it slightly to get it in the right position.
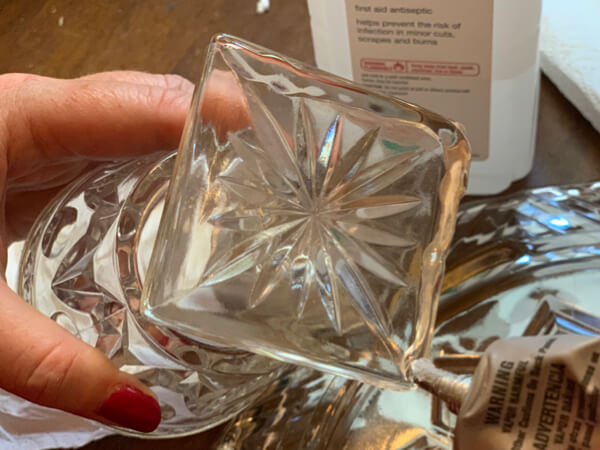
If you were a really precise crafter you could measure and make a mark on the top of your platter so that you could see it from the bottom. But I simply turn it over to look through both sides multiple times to make sure it's directly in the center before it sets for good.
Clean up any residue that squished out of the goblet/glass/candlestick from misalignment on your DIY easy cake stand.
If you don't feel that it has enough glue, run a small bead of glue around the outside of where the goblet meets the platter. You are going to be painting over all this, so you really cannot mess it up (thank goodness, right?!!).
Step 1a: Glue Knob On Top Of Candy Dish
If you want to make the candy dishes, then you'll need to glue a marble to the top of the flat lid to make a knob.
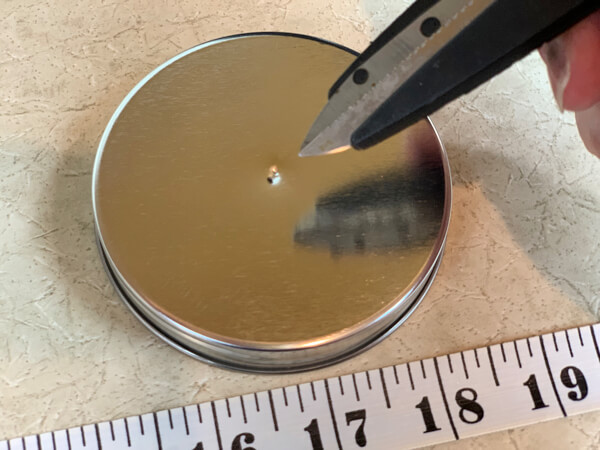
Measure using your ruler or measuring tape to find the center of the lid and mark it with a pencil.
Use a pair of scissors or another pointy object to press a dimple in the top of the lid. Be careful not to push too hard, you don't want a hole, just a dimple to make sure the marble doesn't sit on top if the lid.
Put a small dollop of E-6000 glue to the dimple and press the marble on top. Now set it aside to dry with the other cake plate(s).
Step 2: Set Aside To Dry
Unfortunately this is the hardest part… you need to let your new cake stand sit still for several hours so the glue can cure in order for it to be most stable.
Put in a place to dry where it will not be bothered or moved as the glue takes time to fully cure.
It's best to let it dry overnight, but after about 6 hours you could start painting and not worry about them coming apart.
{I forgot to get a picture of this boring step… so the photo above is what it looked like after it was glued, but after I painted the top side.}
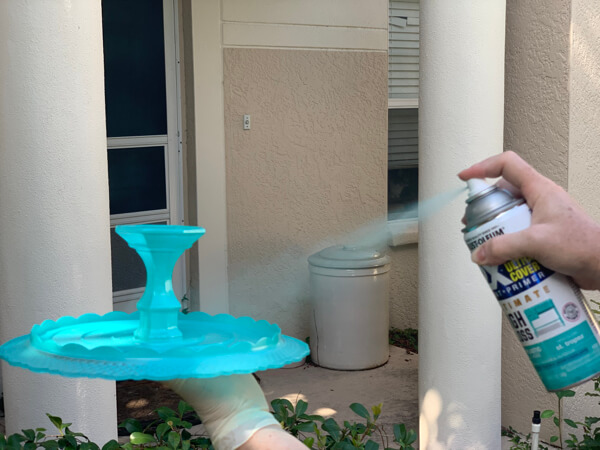
Step 3: Paint
This part is fun… make sure you paint in short light strokes that are kinda far away from your item.
If you paint too thick then the paint will dry with a “crackle” effect. It's not gonna ruin your gift, but you'll notice and it'll make you want to start over with a new piece.
To avoid the crackle effect, just paint in light layers. Easy!

It took 3 coats for me to get to the desired opaqueness that I wanted. I just painted, set a timer on my phone for 20 minutes, went inside and did something (well, okay, I was writing this post… but I could've been doing the laundry or watching half a baking show on Netflix), then went back out and painted.
Each time I painted it took about 5 minutes.
Make These The Fun Vintage Glass Cake Stands As Gifts:
Of course these DIY easy cake stands aren't just for cakes!
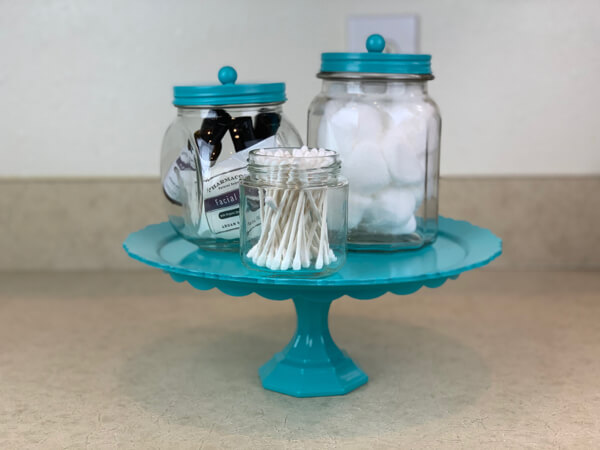
- Instead of candy inside the extra canisters, make it a guest tray for the bathroom. Put cotton balls and travel size shampoos & conditioners, body lotion and body wash in the glass jars, then add a small container of Q-tips too. How welcoming is that?!!
- Add a dark green plant on top and now it's a beautiful plant stand.
- Gather some pretty pillar or decorative candles and now it's a candle display.
- Add some coffee cups, sauces, creamer, spoons and sugar, and now it's a morning coffee tray.
- Gift your cake stand with some homemade foaming hand soap, hand lotion and a sugar scrub.
- Or gather some flavored olive oils and seasonings to keep by the stove when cooking.
- Put some cookies in some tiered boxes and stack them on top of your vintage glass cake stands for a “sweet” gift.
- Load your vintage glass cake stands with small treats like bon-bons, candies, spiced nuts, etc. and wrap the whole thing with see-through cellophane.
- Know of someone who is always losing their keys or wallet? Add a basket on top of these vintage glass cake stands where they can dump their belongings when they get in the door. You could even paint a key on top or their monogram in gold or black.
Vintage Glass Cake Stands Make Great Organizers Too:
We have always struggled to keep the back corner of my kitchen clean and organized. One day I heard a professional organizer say that to keep a normally cluttered area clean, you just need to “lift everything up” by using a raised cake plate. I was sold!
That corner has stayed organized ever since. And it looks cute too. Here are a few other ways that a cake stand can help you get (and stay) organized too:
- Use it as a display for cherished photos.
- Organize Makeup
- Nail Polish Tray
- Jewelry Organizer
- Perfume Organizer
- Night Stand Organizer
- Office Supply Organizer
- Craft Supply Organizer
- School Supply Organizer
- Fresh Fruit Display
- Guest Bathroom Necessities like lotion, Poo-Pourri, etc.
BONUS FREE DOWNLOAD
Save Money On Your Craft Supplies
Download this FREE Guide to find 25 Ways to save money when you buy craft supplies so that your beautiful creations cost less.
Save Money On Your Craft Supplies
Download this FREE Guide to find 25 Ways to save money when you buy craft supplies so that your beautiful creations cost less.
These DIY easy cake stands are also great for decorating for the holidays. They are great to display floral, greenery, holiday items and even more vintage items.
What Does It Cost?
As I mentioned at the top of this post, you have a couple options as you create your favorite one of these vintage cake stands (or both!).
Here's the cost breakdown for each one:
Option 1: Plastic & glass cake plate $5.96 = plastic cake plate, glass candlestick and spray paint = $1 +$1 + $3.96
Option 2: Glass platter & goblet cake plate $7.94 = one vintage glass platter or plate, one vintage goblet/glass/candlestick, spray paint = $2.98 + $1 + $3.96
I think it's super cute to add in the candy containers for $1 each and hopefully you have some marbles on hand to save that extra $1 from having to buy a bag.
Total Cost with candy containers: $7.96 (plastic plate) and $9.94 (glass plate)
So you see how pretty and cheap these glass cake stands can really be! And since the drying time is the only hard part about this project, it is super simple too.
And don't they make a great gift?! There are so many ways to dress them up!
These vintage glass cake stands are so great because you can use them for gifting, displaying, and even organizing. And as a mama, you know that’s a constant chore.
Your Turn: How are you going to use these vintage glass cake stands for gifts and organizing this year? Share with me below!