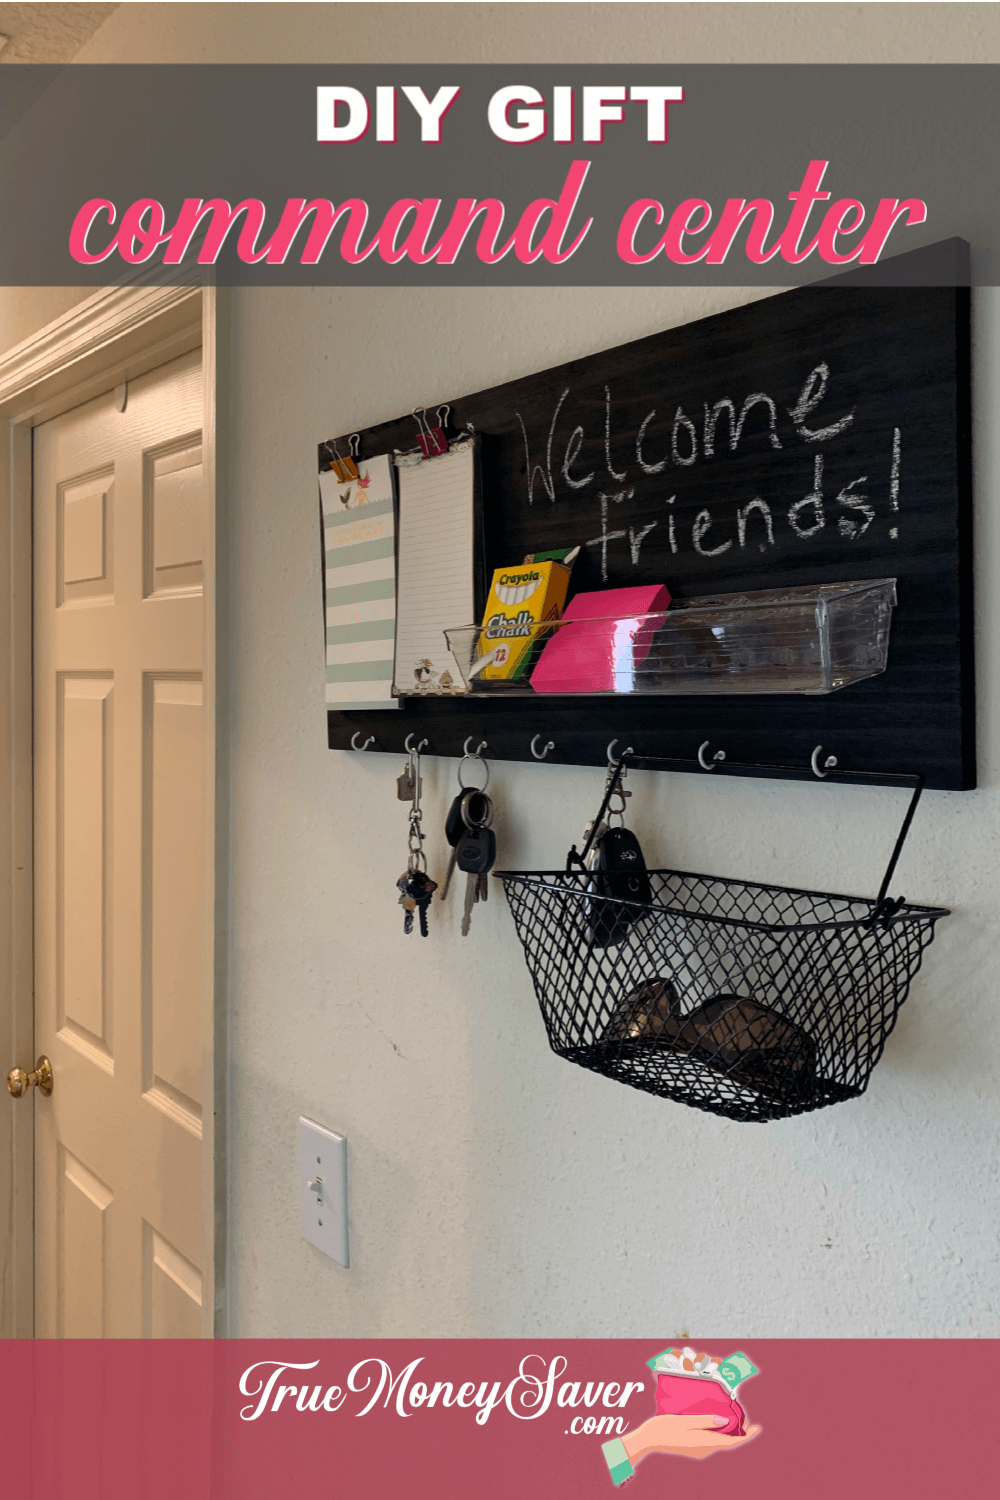
We do and it's amazing! From writing notes and stashing mail and keys, it's a great way to stay organized with the craziness of life.
But what better gift to help your mommy friends and family stay organized than by giving them their own DIY Entryway Command Center as a gift this year! 
And this simple wall command center is so cheap to make. For around $10 you'll have everything you need to make a great gift!
Plus, this kitchen family command center is so simple to make! No saws are required, well, you'll have them cut it at the home store so you don't need a saw to do this project!
And your friends and family are going to love something that you made by hand just for them!
This post is part of our 30 Days of Homemade Gifts Series. 30 gifts that are easy (and cheap) to make, but also something you’ll be proud to give.
Each Homemade Gift has to meet 5 stipulations in order to maximize your money and make it easy for a busy mom to do:
- Easy to obtain supplies – Supplies are things you might already have on hand or are easy to find at Walmart or a craft store so you can get them in the same day you want to make it.
- Easy to make – Supplies are easy to work with or use so that anyone could do it… not caustic… so you could do the craft with your kids.
- Quick to make – It can be made in 30 minutes or less so it’s possible to make this gift in the middle of the night with products you most likely already have on hand. (Note: The 30 minute guide is your “hands on” time, dry time is excluded. This project takes extra drying time.)
- Cheap to make – You should be able to make the project without spending more than $10.
- Substantial – Each gift is “big” enough that you'll feel confident giving it alone and not having to add a gift card to it.
BONUSES:
Multiple uses – Multiple gifts can be made out of the same supplies giving you options to use up all the supplies you buy.
Saving Money Double Bonus: Try to think about what you already have on hand to upcycled and save more money.
So let's get busy making this DIY entryway command center!
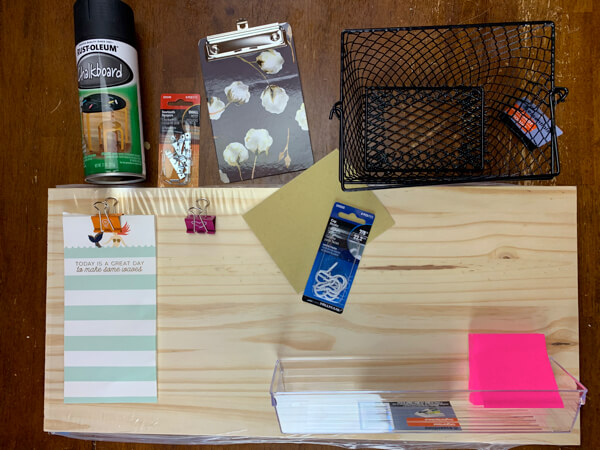
DIY Entryway Command Center Supplies:
- 1″x12″x24″ piece of wood. This board will come 4′ (feet) long, just ask them to cut it in half making two 24″ pieces. They will cut it for free in seconds = $10.92 total for the one cut board (@ Lowe's)
- Craft Paint – $.98 (@ Walmart)
Side Note: I wanted to make mine a Chalkboard, that raises the total cost of this project and the Chalkboard paint is $3.96 @ Walmart - Sandpaper – $1 (@ Dollar Tree)
- Paintbrushes – $1 (@ Dollar Tree)
- Cup Hooks 7/8″ 8 pack – $1.78 (@ Lowe's)
- Bull Dog Clips, Binder Clips or Small Clipboard to hold a notepad or two – $1 (@ Dollar Tree)
- Clear Tray or Wire Basket – $1 (@ Dollar Tree)
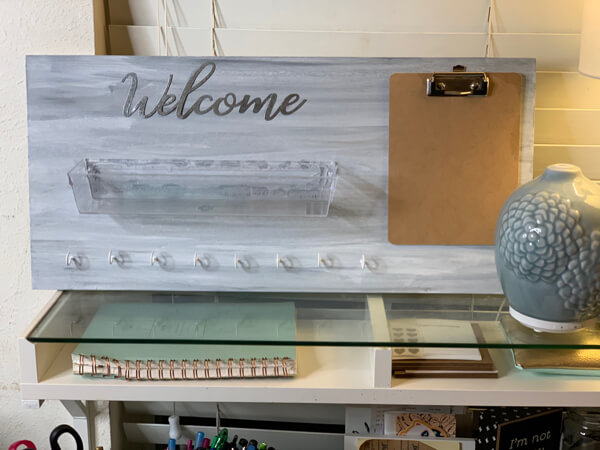
- Welcome Sign or other saying small enough to fit on the board with room for the other elements (optional)
(Check out step #4 below for other options if you can't find a sign) - Picture Hangers 3 pk or Ring Picture Hangers so you can hang your sign on the wall – $1.94 (@ Home Depot)
- E6000 or Hot Glue Gun (and sticks) to adhere your embellishments to your sign ($3.97 for 3 oz tube @ Walmart)
- Painters Tape – $3.97 (@ Home Depot)
- Pencil
- Ruler or Measuring Tape
- Hammer
- Screwdriver
- Damp rag to wipe off dust and paint
- Heavy books to hold elements down as the glue dries
Check to see what you already have on hand for your simple wall command center. I already had the binder clips (they are a couple of my favorite ones). Look in the junk drawer and the garage as those places always have some extra items hiding that you might be able to use. A little bit of digging might save you some money in the long run!
BONUS FREE DOWNLOAD
Save Money On Your Craft Supplies
Download this FREE Guide to find 25 Ways to save money when you buy craft supplies so that your beautiful creations cost less.
Save Money On Your Craft Supplies
Download this FREE Guide to find 25 Ways to save money when you buy craft supplies so that your beautiful creations cost less.
Directions:
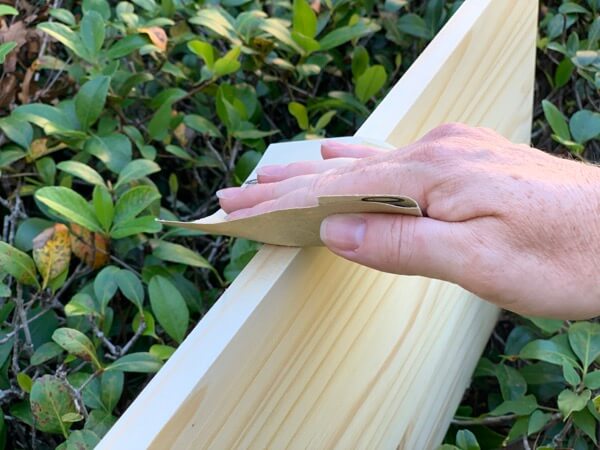
Step 1: Sand Down Wood Command Center
Your first step should always be to smooth down the wood. Take your sandpaper and run it over any pointy edges, on the sides where the wood was cut and all over just to make sure the wood is smooth and your gift recipient doesn't get splinters. Plus, this will help the paint stick too.
Wipe the wood down with a damp rag to brush off the dust to ensure it doesn't get in your paint.
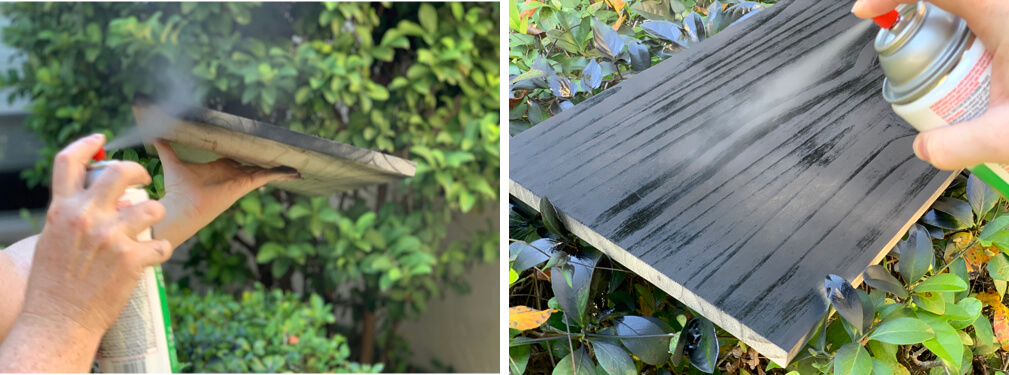
Step 2: Paint The DIY Entryway Command Center
Once you have wiped the wood clean, you can go ahead and paint it.
I chose the chalkboard paint, but my friend used a grey paint that she thinned out with a little water so you can see the wood grain. Then she layered white on top. It turned out so pretty (there's a photo at the end of this post).
Choose the best option for your gift recipient.
Pro Tip: If you are needing to speed up the process of the paint drying, your hairdryer will do the trick!
Step 3: Add The Picture Hangers To The Back Of The Board
We can't forget that we will need to be able to add this to the wall.
This DIY entryway command center will not be holding anything too heavy, so measure in 4 inches from each end and make a mark.
Attach the picture hangers at this spot, one half to one inch down from the top of the board.
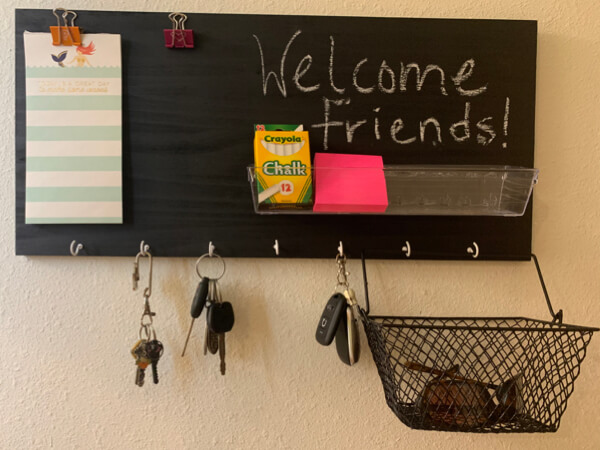
Now it's ready to make someone's (or your) life more organized!
Step 4: Lay Out The Design For The DIY Command Center
Now that you have a prestine canvas, you want to have a good idea about where everything is goingi on your command center. Layout the sign, cup hooks and basket placement first so you know everything fits.
First, if you are adding a sign, that placement will determine everything else. Add it first with hot glue or e6000.
If you couldn't find a sign you liked or would like to add the last name of the family instead, you could try using this tutorial to make Rope Name Art. Or you could make an adorable word sign with metallic wire (floral wire is $1 at Dollar Tree).
Optional Chalk Board Section: (not on my command center shown)
If you could not find a sign to add to your kitchen family command center, or you want to be able to change your word, simply add a chalkboard section with chalkboard paint. That way your gift recipient, can write any saying they want to.
A bottle of chalkboard paint can be found at Dollar Tree for $1 (much less than the $4 for the spray can).
After your base paint has dried, tape off the section you want to add your chalkboard paint.
Paint the section with the chalkboard paint using the manufacturer's instructions. Let dry completely before adding the other elements.
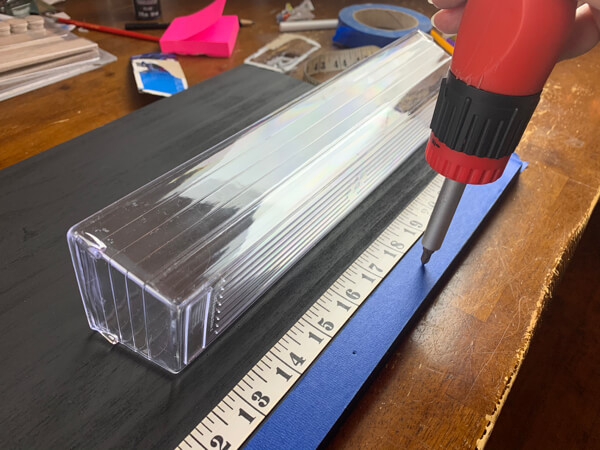
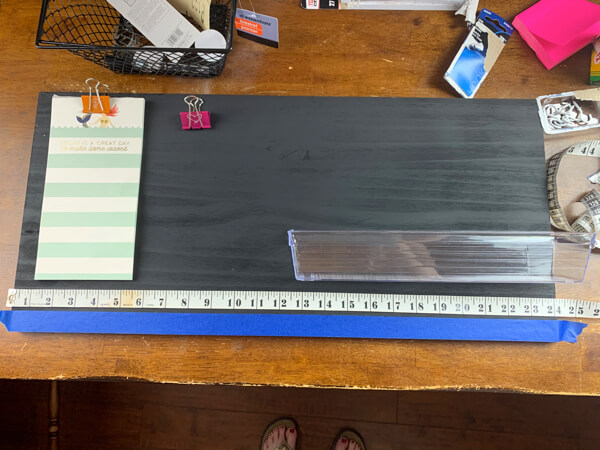
Step 5: Measure & Add Cup Hooks
Next, add the cup hooks for the keys. I use painters tape to measure how far I want my hooks. The tape is 1″ thick, so pressing it along the bottom of the wood gives you a straight 1″ line.
Measure across the wood to determine where you want your hooks to go.
I decided not to use all 8 hooks on mine because I wanted them spaced 3 inches apart. That meant I needed to make marks at the 3″ 6″ 9″ 12″ 15″ 18″ and 21″ marks.
Use a screwdriver to make marks 1/2 of the tape, or if you'd like your hooks to hang slighly higher, you could make marks at the top of the tape.
It's fun to customize your DIY entryway command center based on how you want it set up. (You'll see how different my friend's turned out at the bottom.)
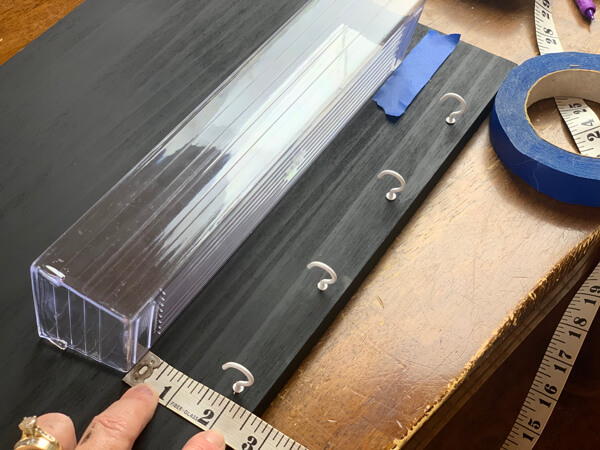
Step 6: Measure & Add Tray (or Basket)
Then, measure and figure out where you want to put the tray (or basket). This will be a great place to store pens and pencils.
I like to measure everything with painters tape by measuring and then using that to make my straight line that I can then just line up my element to it. (less brain work = happy mommy)
As you can see in the photo, I made my tray 2.5″ from the bottom of the board. To ensure it was level, I measured up 2.5″ and then taped across the board where I'd line up the tray once I had glue on the back.
You could also use some extra cup hooks to hook a wire basket instead of a clear tray like I used.
Once you've got it all measured, add glue to the back and press onto your board. Depending on your tray style, you might need to have some heavy books on hand to lay on top to ensure your tray is pressed down while the glue dries.
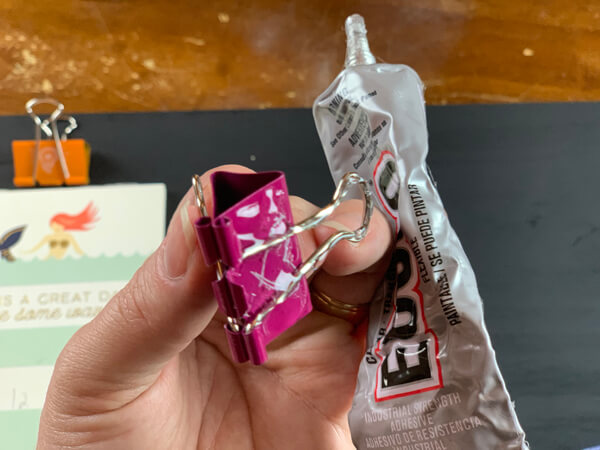
Step 7: Measure & Add Clips (or Small Clipboard)
The last thing to do is to measure and add where the binder clips, big bull dog clips or small clipboard will go.
You could also hang these elements with cup hooks.
I wanted two binder clips in order to have one place for a note pad and one for receipts.
What Does It Cost?
- 1″x12″x24″ piece of wood – 1/2 of the 4′ board = $10.92 = $5.46 for one (@ Lowe's)
- Craft Paint – $.98 (@ Walmart)
- Sandpaper – $1 (@ Dollar Tree)
- Paintbrushes – $1 (@ Dollar Tree)
- Cup Hooks 7/8″ 8 pack – $1.78 (@ Lowe's)
- Binder Clips, Small Clipboard or Bull Dog Clips to hold a notepad or two – $1 (@ Dollar Tree)
- Clear Tray or Wire Basket – $1 (@ Dollar Tree)
- Welcome Sign or other saying small enough to fit on the board with room for the other elements (optional)
(Check out step #4 below for other options if you can't find a sign) - Picture Hangers 4 pk or Ring Picture Hangers so you can hang your sign on the wall – $1.94 (@ Home Depot)
- E6000 or Hot Glue Gun (and sticks) to adhere your embellishments to your sign ($3.97 for 3 oz tube @ Walmart)
- Painters Tape – $3.97 (@ Home Depot)
- Pencil – $0
- Ruler or Measuring Tape – $0
- Hammer – $0
- Damp rag to wipe off dust and paint – $0
- Heavy books to hold elements down as the glue dries – $0
As Low As: $9.21 + Paint That's for one 24″ Wood section, (8) cup hooks, clipboard or binder clips, (1) clear tray, picture hangers (1/2 pkg) = $5.46 + $1.78 + $0 + $1 + $0.97.
Chalkboard Version = $13.17 That's for one 24″ Wood section, (8) cup hooks, clipboard or binder clips, (1) clear tray, picture hangers (1/2 pkg) + Chalkboard spary paint = $5.46 + $1.78 + $0 + $1 + $0.97 + $3.96.
White & Grey Craft Paint Version = $11.17 That's for one 24″ Wood section, (8) cup hooks, clipboard or binder clips, (1) clear tray, picture hangers (1/2 pkg) + white and grey craft paint = $5.46 + $1.78 + $0 + $1 + $0.97 + $0.98 + $0.98.
For around $10 you'll have everything you need to make a great gift. It'll be even less if you already have some of the supplies on hand (like I did with the binder clips).
Plus, no saws or power tools required! This family command center is so simple to put together for a gift. Your friends and family are going to love that you made for them with your own hands
YOUR TURN: What other elements would you add to this command center to help you stay organized? I'd love to hear your ideas in the comments below!
BONUS FREE DOWNLOAD
Save Money On Your Craft Supplies
Download this FREE Guide to find 25 Ways to save money when you buy craft supplies so that your beautiful creations cost less.
Save Money On Your Craft Supplies
Download this FREE Guide to find 25 Ways to save money when you buy craft supplies so that your beautiful creations cost less.
Other Command Center Ideas
So what else could you use this simple wall command center for? Here are several great ideas!
- Kitchen Station: to hold recipes, add a magazine rack to hold cookbooks, add utensils or coffee mugs on the cup hooks
- Pet Care Station: cup hooks to hold leashes and collars, add a hose clamp and a mason jar to hold treats
- Office Command Center: Add baskets for mail and organizing office supplies, add clipboards to hold to-do lists
- Bathroom Organizer: Add baskets to hold toothbrushes and toothpaste, cup hooks to hold hair ties and bows
- Honey Do List: Large clipboard and notepad for all those to-do projects around the house
- Homework Station: Baskets for holding school supplies, clipboards or clothespins to hold to-do lists and artwork
- Coffee/Tea Station: cup hooks for coffee mugs, baskets for tea bags, coffee pods, sugar packets, stir sticks, coffee pods, creamer singles, napkins, etc.
But don't let these ideas stop you! Use your imagination as to what else you could use this idea for.
Comment below with how you're going to make yours and share your genius idea!