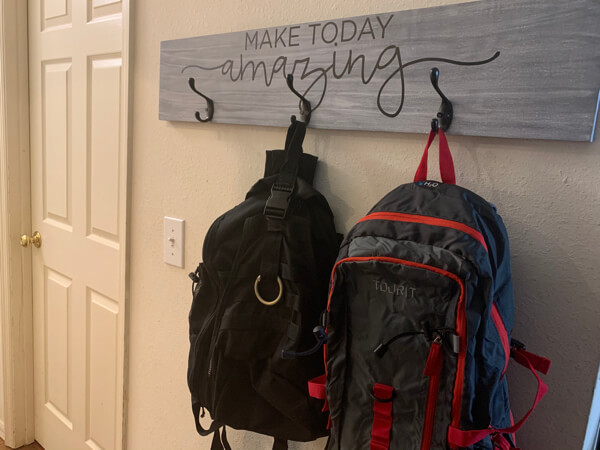
 Looking for a DIY Rustic Coat Rack for your walls or to make for a useful gift this year?
Well, I’ve got you covered!
This DIY Rustic Coat Rack is the best thing to keep things off the ground so you don’t trip over them. Who doesn’t love to be more organized?!!
I know what you are thinking…what kind of work does this simple wall coat rack actually entail? Well, you don’t have to use a circular saw, and there are no special or expensive tools that you will need either. YAY!
You probably already have almost everything you need and you can make it in one afternoon. That’s right! Most of the time you’ll spend waiting for the paint to dry.
I promise you that YOU can do this. I mean, come on! We’ve birthed babies – we can screw a couple of screws in, right?!! Of course, we can! So don’t let this project intimidate you.
And if creating something with your own hands isn’t the most satisfying thing ever (well, besides birthing babies), you’ll love making this DIY rustic coat rack.
Plus, if you’re looking for a substantial gift to give someone that doesn’t cost a lot, this gift is it! For just about $16, you can make this gift!
This post is part of our 30 Days of Homemade Gifts Series. 30 gifts that are easy (and cheap) to make, but also something you’ll be proud to give.
Each Homemade Gift has to meet 5 stipulations in order to maximize your money and make it easy for a busy mom to do:
- Easy to obtain supplies – Supplies are things you might already have on hand or are easy to find at Walmart or a craft store so you can get them in the same day you want to make it.
- Easy to make – Supplies are easy to work with or use so that anyone could do it… not caustic… so you could do the craft with your kids.
- Quick to make – It can be made in 30 minutes or less so it’s possible to make this gift in the middle of the night with products most likely already have on hand. (Note: It takes extra dry time and baking time for this project.)
- Cheap to make – You should be able to make the project without spending more than $10.
- Substantial – Each gift is “big” enough that you’ll feel confident giving it alone and not having to add a gift card to it.
BONUSES:
Multiple uses – Multiple gifts can be made out of the same supplies giving you options to use up all the supplies you buy.
Saving Money Double Bonus: Try to think about what you already have on hand to upcycled and save more money.
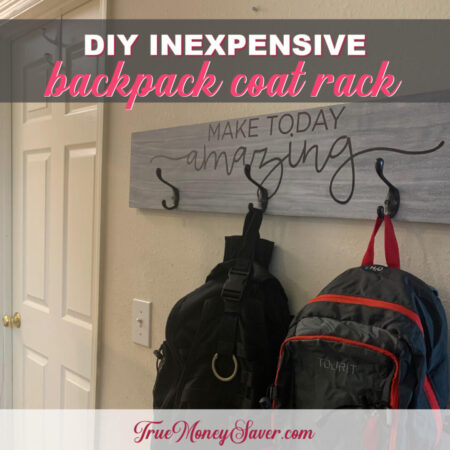
Are you ready to make this simple DIY wall hook backpack coat rack? Let’s get busy!
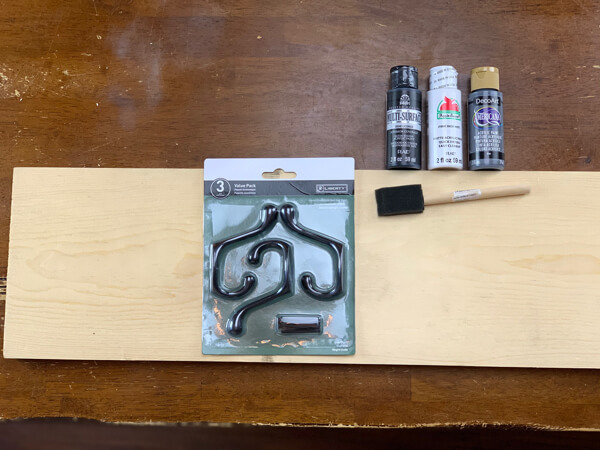
Supplies:
- 1″x8″x6′ Wood Board (1 inch by 8 inches by 6 feet) – $11.13 (@ Home Depot) = $5.57/per board
(You can make this DIY Rustic Coat Rack from any size or width wood you want to. You could even use a piece of scrap you wood you already have to make it. There are cheaper options for boards, I just chose this one because of the width.) - Coat Rack Hooks 3 pk – $8.98 (@ Home Depot)
- (2) Sawtooth Picture Hangers with nails – $1.99 (@ craft store or Walmart)
- Paint or stain – Price depends on what technique you choose and what you already have on hand. I used a basic acrylic paint from Walmart that cost $1.47.
- Sandpaper
- Paintbrush
- Measuring tape or ruler
- Pencil
- Hammer
- Screwdriver
Most of us or someone we know has some scrap wood just lying around to make this simple wall coat rack. Ask your neighbors, friends and family to see if they have any paint, stain or scrap wood laying around to make this wall coat rack with hooks project even cheaper. It never hurts to ask for some freebies!
Remember, you don’t have to make this wall coat rack with hooks with this exact size of wood. I chose this size of wood because of it’s size and because I could make 2 racks from one piece of wood.
BONUS FREE DOWNLOAD
Save Money On Your Craft Supplies
Download this FREE Guide to find 25 Ways to save money when you buy craft supplies so that your beautiful creations cost less.
Save Money On Your Craft Supplies
Download this FREE Guide to find 25 Ways to save money when you buy craft supplies so that your beautiful creations cost less.
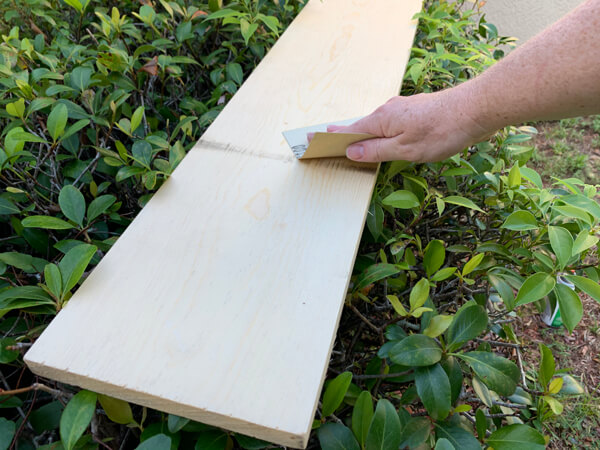
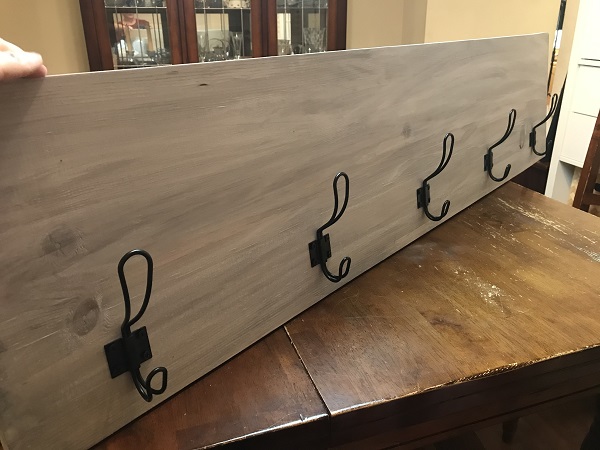
Step 1: Smooth With Sandpaper
Grab some sandpaper and make sure the edges are smooth, especially on the very ends of this simple wall coat rack.
Notice that big black mark in the middle of my board. I sanded it away so that it wouldn’t show up on my final project. Sandpaper can fix/remove any flaws you have in your wood to make it look better before you start your backpack coat rack project.
Step 2: Decide On How You Want To Paint Or Stain
Depending on the look you are going for, decide on whether you want to paint or stain your DIY rustic coat rack or do a combination of both.
There are a ton of tutorials that you can find on how to do just about every paint technique there is.
Go ahead and complete your paint or stain technique on your wall coat rack with hooks.
Make sure that you paint all the sides too.
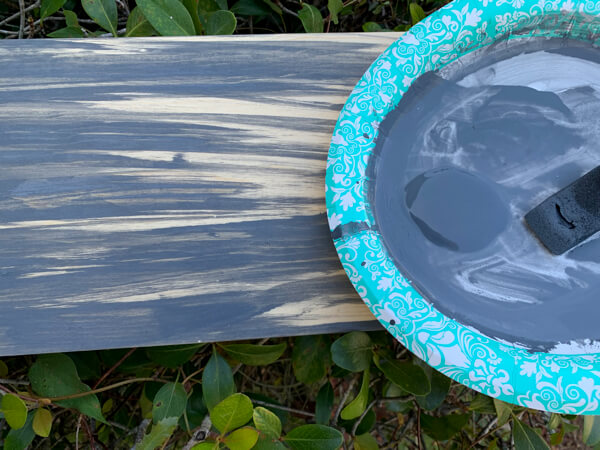
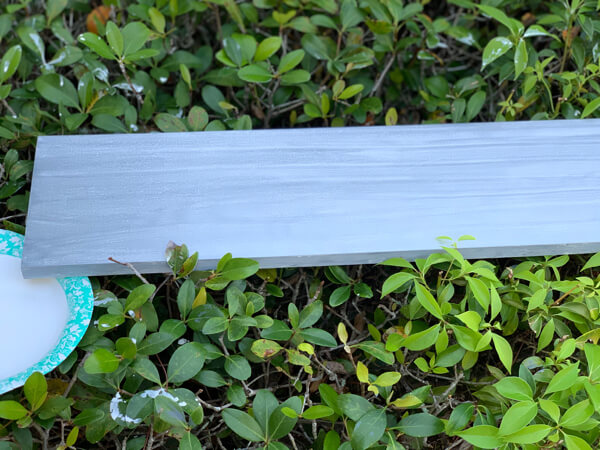
I used a grey color first (called Oyster). As you might be able to see in the photo, I watered down the paint (ratio of 1:1) to thin it out so that the wood grain would show through.
After the first coat of grey was dry, I painted right on top of it with white paint that was watered down the same way.
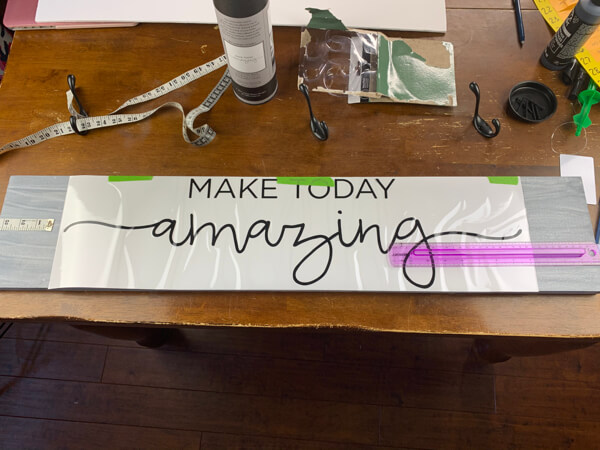
(Optional) Step 3: Add A Saying
I knew I wanted to add an inspirational saying to the top of my backpack coat rack for my kids to see each time they picked up their bag. Obviously this will add extra money to your rack.
Measure equally from each side and place your saying. This one was a vinyl sticker that just pressed right on top of the paint.
To save money, if you have a friend that has a cricut machine, you could buy the vinyl and ask them to cut the words for you.
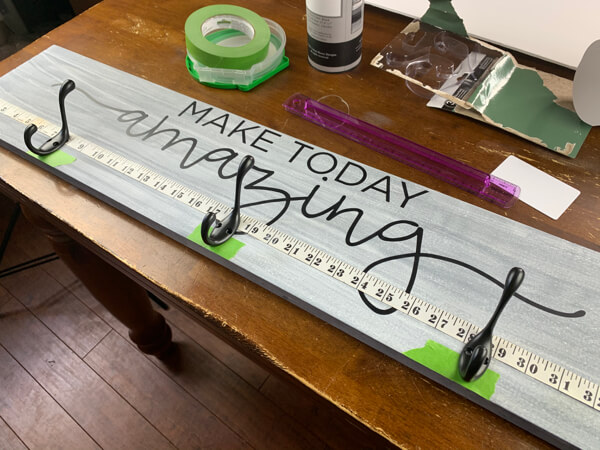
Step 4: Add The Hooks
Depending on the amount of hooks you bought, decide where you want to place them. Always do the math to divide your wood up and determine how much space you want in between the hooks. My first instinct is to divide evenly, but that’s not the smartest idea because that leaves extra wasted space at each end.
Measure up from the bottom and add a couple of marks on each end. Add some painters tape up to your mark.
Then space out your hooks evenly. I love adding the painters tape so I can make marks on the tape and not the wood.
Once you have figured out the placement for the hooks, add a pencil mark where the holes for the hooks should go.
Press your screw into the hole mark to indent it so you can see where it needs to be aligned.
Screw them in and get excited to hang this bad boy on the wall!
Get Creative And Have Fun
You don’t have to make this exact DIY rustic coat rack, get creative!
Paint the board with chalk paint and add the hooks all at the bottom so you have a chalk board up on the top section. Just think about what you could create and write for the different seasons!
Add all the hooks at the bottom and add the first letters of your children’s name in wood letters up top so they can put their backpack on their hook after school. Or add a clothespin and add their picture to it!
BONUS FREE DOWNLOAD
Save Money On Your Craft Supplies
Download this FREE Guide to find 25 Ways to save money when you buy craft supplies so that your beautiful creations cost less.
Save Money On Your Craft Supplies
Download this FREE Guide to find 25 Ways to save money when you buy craft supplies so that your beautiful creations cost less.
Add baskets to the hooks to collect small things like umbrellas or mail.
Don’t forget about your pets! Add baskets and wood bone shapes to keep your pet things organized and within reach.
My friend made the one above and it didn’t cost her much more! (1″x12″x4′ Board = $10.52, 2 craft paint tubes @ $1 each = $2, 5 hooks from Amazon = $10.99 at a total cost of $23.51)
How Much Does A DIY Backpack Coat Rack Cost?
- 1″x8″x6′ Wood Board (1 inch by 8 inches by 6 feet) cut down to 3 feet – $11.13 (@ Home Depot) = $5.57 per board
(You can make this DIY Rustic Coat Rack from any size or width wood you want to. You could even use a piece of scrap you wood you already have to make it. There are cheaper options for boards, I just chose this one because of the width.) - Hooks 3 pk – $8.98 (@ Home Depot)
- (2) Sawtooth Picture Hangers with nails – $1.99 (@ craft store or Walmart)
- Paint or stain – Price depends on what technique you choose and what you already have. I used two acrylic paints (Oyster color and White) from Walmart that costs $1.47.
- Sandpaper – $0 (or $1 @ dollar store)
- Paintbrush – $0 (or $1 @ dollar store)
- Measuring tape or ruler – $0 (or $1 @ dollar store)
- Pencil – Free if you already have some
- Hammer – $0 (or $1 @ dollar store)
- Screwdriver – $0 (or $1 @ dollar store)
Total Cost: $14.55 (wood plank, & hooks – if you already have paint, stain & picture hangers) Add an extra $5 for a vinyl self adhesive sign ($10 on sale, or using a 50% off coupon to make it $5).
Can see how easy this is to make? You probably already had almost everything you needed to make this simple wall coat rack.
I know you can do this! It’s really not hard at all to make this wall coat rack with hooks.
And creating something with your own hands is so satisfying! You’ll love making these simple DIY wall hook racks for all your family and friends.
Plus, giving a substantial gift that didn’t cost you a lot, always feels so good to me and my pocketbook!

More Fun Articles To Read: