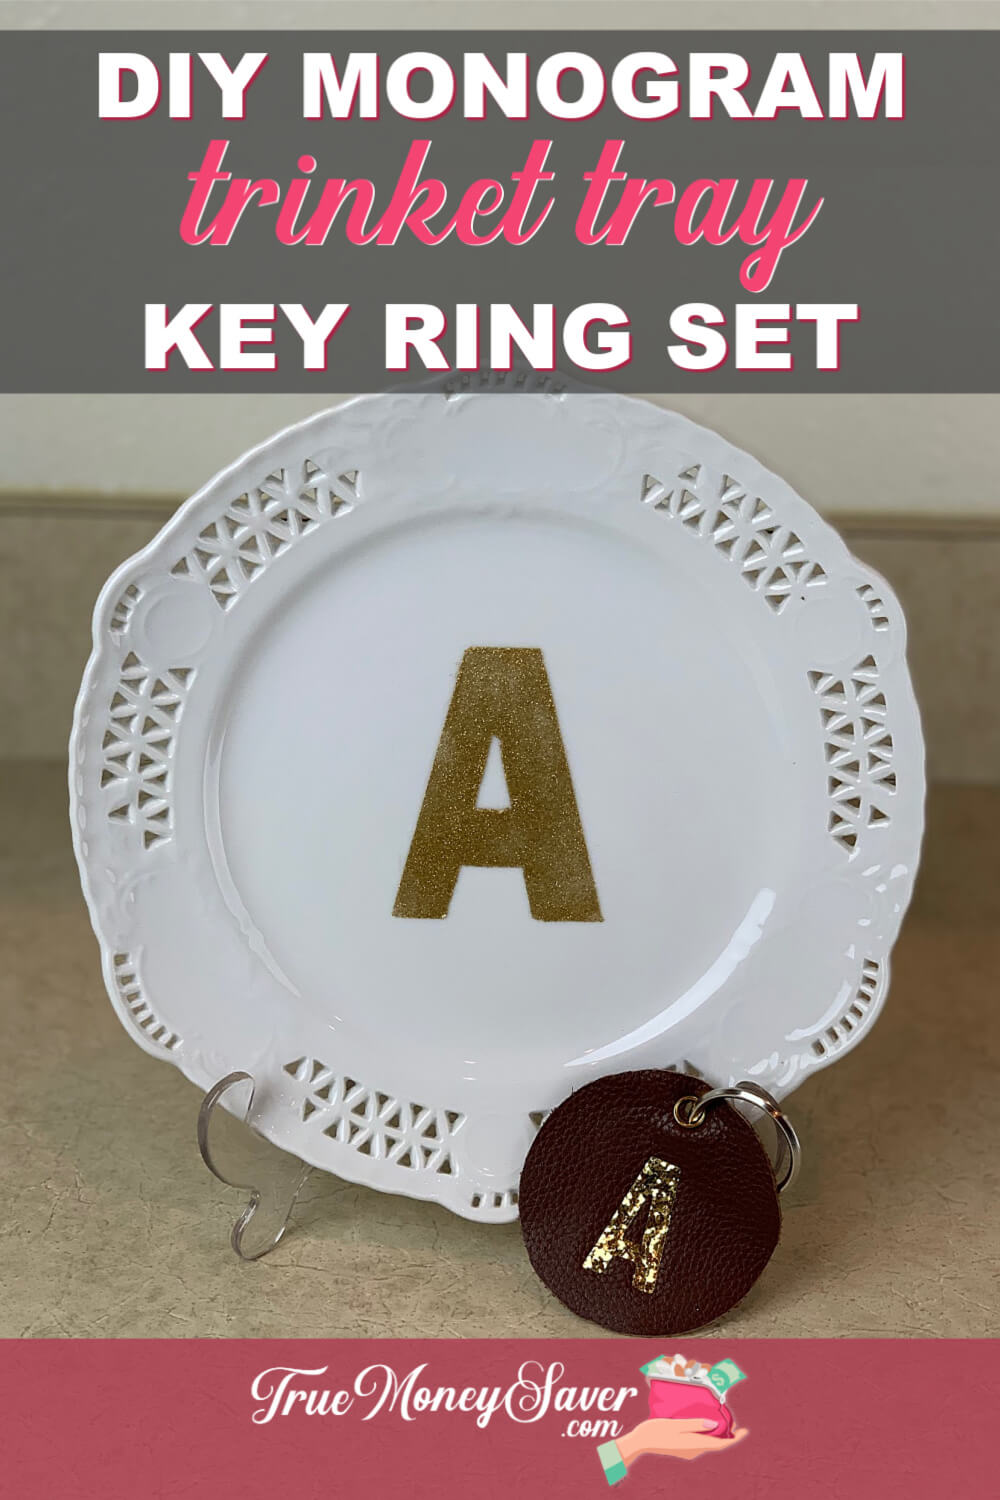
You know, the tray that you put everything into as you walk in the door so it doesn't grow legs and walk off? Yup, that kind of trinket tray.
While I don't personally need one at the moment, I know of several people who could use one and get into the habit of using one. You see, their keys, wallet, glasses, etcetera, etcetera, disappears the moment they walk into the door. 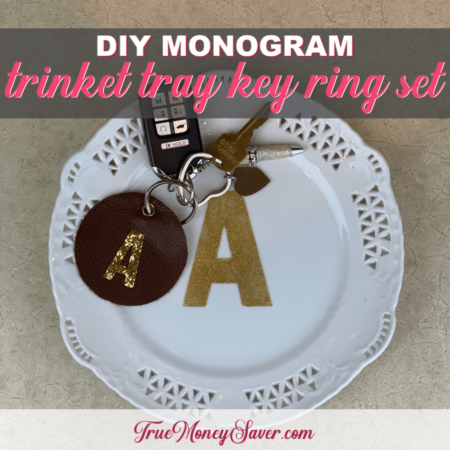
If only they used a jewelry plate ring dish or an entryway key dish to dump their stuff into when they got home, things just wouldn't disappear! Right?!
So that's why this year I'll be making several of these DIY trinket tray gifts for my friends and family.
Using this simple DIY ring dish technique you can use it as a key or jewelry dish, but you could also use it as a fancy bar soap holder, dish sponge holder, candle holder, etc. The possibilities are endless for what this DIY key dish or trinket tray could be used for. I love gifts that have multiple uses.
And it's super simple to make. Can you work a paintbrush? If yes, then you can make this!
While it does need drying time in between coats, this is a project is super cheap to make! You'll be surprised at how little these entryway key dish plates cost me!
I love making personalized gifts because they aren't the same old gifts that everyone gives! I love giving something that I made myself! Don't you?!!
This post is part of our 30 Days of Homemade Gifts Series. 30 gifts that are easy (and cheap) to make, but also something you’ll be proud to give.
Each Homemade Gift has to meet 5 stipulations in order to maximize your money and make it easy for a busy mom to do:
- Easy to obtain supplies – Supplies are things you might already have on hand or are easy to find at Walmart or a craft store so you can get them in the same day you want to make it.
- Easy to make – Supplies are easy to work with or use so that anyone could do it… not caustic… so you could do the craft with your kids.
- Quick to make – It can be made in 30 minutes or less so it’s possible to make this gift in the middle of the night with products you most likely already have on hand. (Note: The 30 minute guide is your “hands on” time, dry time is excluded.)
- Cheap to make – You should be able to make the project without spending more than $10.
- Substantial – Each gift is “big” enough that you'll feel confident giving it alone and not having to add a gift card to it.
BONUSES:
Multiple uses – Multiple gifts can be made out of the same supplies giving you options to use up all the supplies you buy.
Saving Money Double Bonus: Try to think about what you already have on hand to upcycled and save more money.
So let's get down to creating and crafting something personal this year!
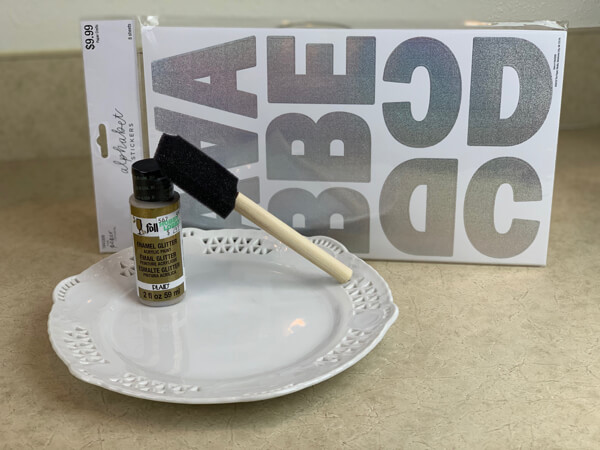
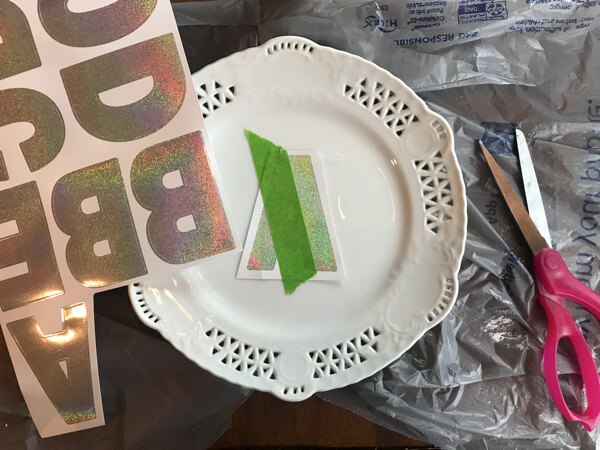
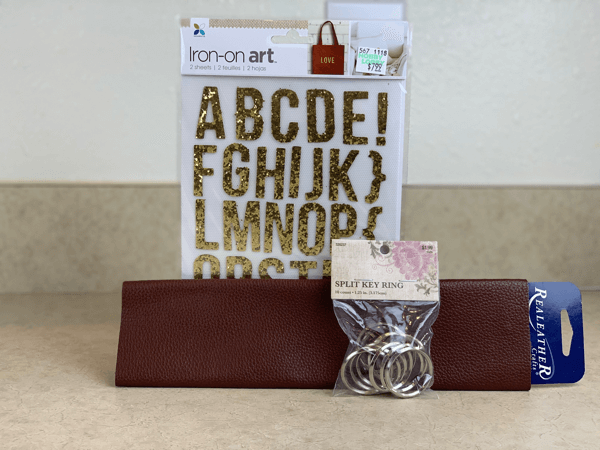
Supplies:
- White small tray or dish (you could even use a clear plate or dish – something that doesn't have a busy design, white porcelain, clear or cut glass would work)
- Monogram stickers (or letter stickers to spell out the name; sized to fit the dish) – prices start at $1.99 (@ Hobby Lobby)
- Paint brush
- Paint
- Mod Podge Dishwasher-Safe Gloss – $5.71 (Optional, if you think you'll use it around food)
- Masking/Painters Tape
- Hair Dryer
- OR Contact Paper with X-Acto Knife to make your own stencil or monogram
- Rubbing Alcohol
- Paper Towels
Check your local thrift stores for some great trinket tray finds. I found four of these plates for only 99¢ each.. It was a bonus surprise to get up to the register to pay and they were 50% off that day. So I paid $2 for all four plates! Talk about cheap!
They also had some cute little clear dishes that would have worked great too. So keep your eyes peeled for some great finds at your thrift stores that would work for your trinket tray, jewelry plate ring dish, or even an entryway key dish.
BONUS FREE DOWNLOAD
Save Money On Your Craft Supplies
Download this FREE Guide to find 25 Ways to save money when you buy craft supplies so that your beautiful creations cost less.
Save Money On Your Craft Supplies
Download this FREE Guide to find 25 Ways to save money when you buy craft supplies so that your beautiful creations cost less.
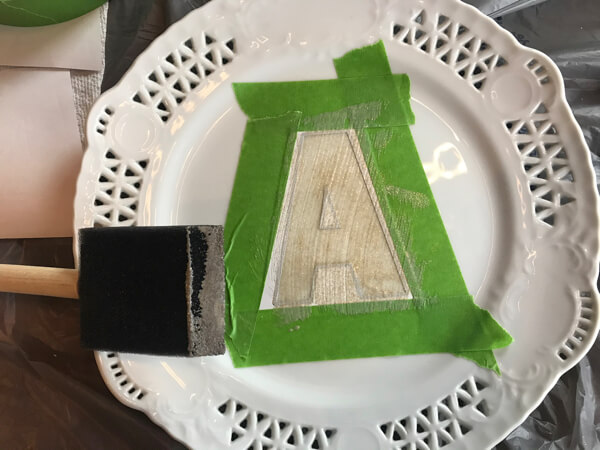
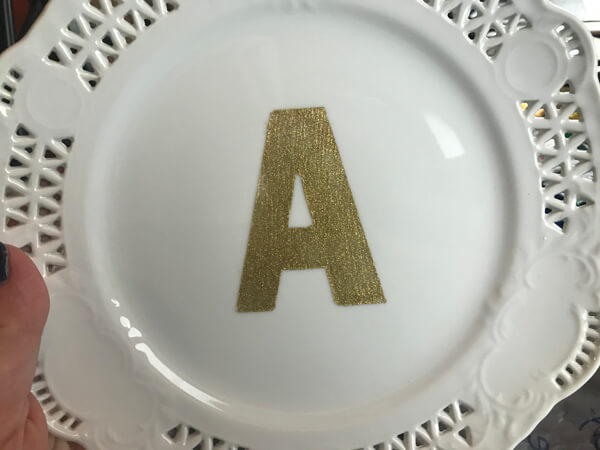
Step 1: Tape Off Where You Want The Letter To Go
This is a really neat trick to use your letter stickers as a stencil.
Peel the backing off your sticker (yes, with the letter in the middle) and tape it all down.
Remove the center letter to make it a template where you'll paint the letter.
Step 2: Start Painting
Using your brush and the paint, paint over the letter template. You really can't mess this up if you use the glitter paint I chose. Thankfully the glitter covers up any “brush lines” you might see.
These DIY trinket tray gift ideas are going to look great!
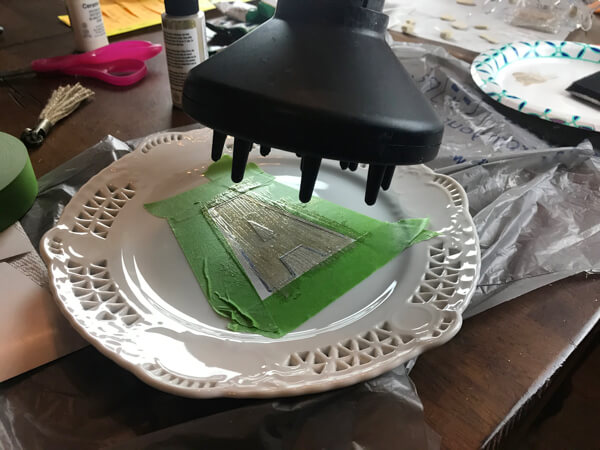
Step 3: Speed Dry The Paint
Use your hair dryer to successfully dry the paint quickly so you can paint another layer or two until the paint is at the darkness you desire.
I used my diffuser so that the blower woudn't be too strong. If you do not have a diffuser, just try not to get too close with the hair dryer in case it moves the paint around.
You can continue to dry each layer of paint to speed up the process and make sure your deisn doesn't smudge.
These DIY trinket tray gift ideas are going to look great!
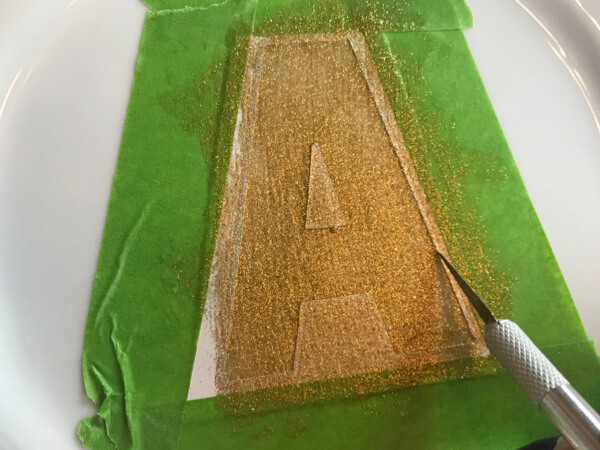
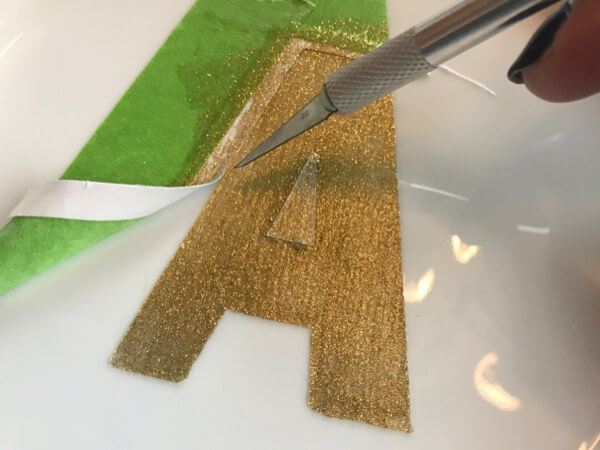
Step 4: Remove The Painter's Tape
Once you're done painting, you need to remove the painter's tape so that it doesn't dry along with the paint and peel off.
As you carefully remove your template, you might need to use an Xacto knife to cut the stencil away from the painted area.
Remove the painters tape to reveal your final design.
BONUS FREE DOWNLOAD
Save Money On Your Craft Supplies
Download this FREE Guide to find 25 Ways to save money when you buy craft supplies so that your beautiful creations cost less.
Save Money On Your Craft Supplies
Download this FREE Guide to find 25 Ways to save money when you buy craft supplies so that your beautiful creations cost less.
Step 5: Let It Cure
The glitter paint that I chose (to match the letter on the key ring) is not dishwasher safe. But it also cures in 21 days by just letting it air dry (so easy!!).
If you want to make your trinket tray dishwasher safe, you can get some Dishwasher Safe Mod Podge and coat over the monogram. Otherwise, just let your recipient know to be gentle with it for 21 days because it is “hot off the presses” and needs that time to cure.
I told you this is a simple DIY ring dish to make for gifts!
Step 6: Make Key Ring
Now listen, I'll be honest, there was a $1.99 Leather Key Chain at the craft store that I passed up because I knew I had this piece of leather (AND the key rings… believe it or not!) I could use instead. Boy was it a pain in the patooski! About 20 minutes in to making this bonus add on gift, I realized I needed to iron the leather because there were some folds I couldn't get around.
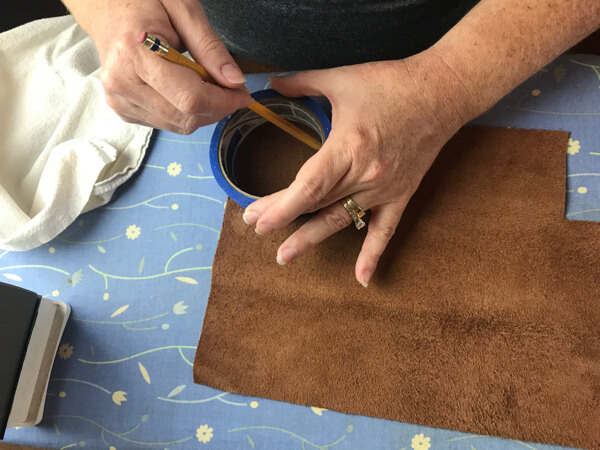
It took me another 20 minutes to research “how to iron leather” on google. (Answer: just use medium heat, no steam, with a dry cotton cloth {I used a kitchen towel} overtop)
I actually figured it out when I ironed the sparkle iron-on on! Humph! Let's not even talk about how to get the hole in the leather… nor all the leather pieces that I cut incorrectly so they ended up being too small. Save yourself a bunch of hassle by getting a partially prepped one for $2. I promise you'll be glad you did.

Anyway, to make the key ring by hand, here's what I did: I traced a circle in the leather and cut it out. Then I made a hole in the leather (using a leather belt hole puncher we already had on hand), added a brass circle from my scrapbooking stash and ironed on the glitter sticker iron on. This makes it sound kinda easy… but I assure you, it was not.
Buy a cheap key ring and add a monogram letter that matches the one you paint on the trinket tray. I promise you, that will be perfect!
What Does It Cost?
- White small tray or dish (you could even use a clear plate or dish) – 50¢ (or you can use small white plates at Dollar Tree)
- Monogram stickers or letter stickers – prices start at $1.99 (@ Hobby Lobby)
- Paint brush
- Masking/Painters Tape
- Rubbing Alcohol
- Paper Towels
- Hair Dryer
Total Cost: $2.49 (plate, & stickers) plus cost of Key Ring
As you can see, this simple DIY trinket tray technique can be used as a key or jewelry dish, as a fancy bar soap holder, dish sponge holder, candle holder, etc. These DIY trinket tray gift ideas are endless! Don't you love gifts that have multiple uses?!
And it’s so simple to make. Gotta love that!!
This project is super cheap to make too! I love that you can use what you find at thrift stores and even dollar stores. Making something that wasn't fancy or special into one super DIY key dish or simple DIY ring dish!
Making personalized gifts makes me feel like I'm giving a thoughtful gift, without it costing much money. And that's a huge win!
YOUR TURN: What kind of trinket tray are you going to make & give this year? Let me know in the comments below!