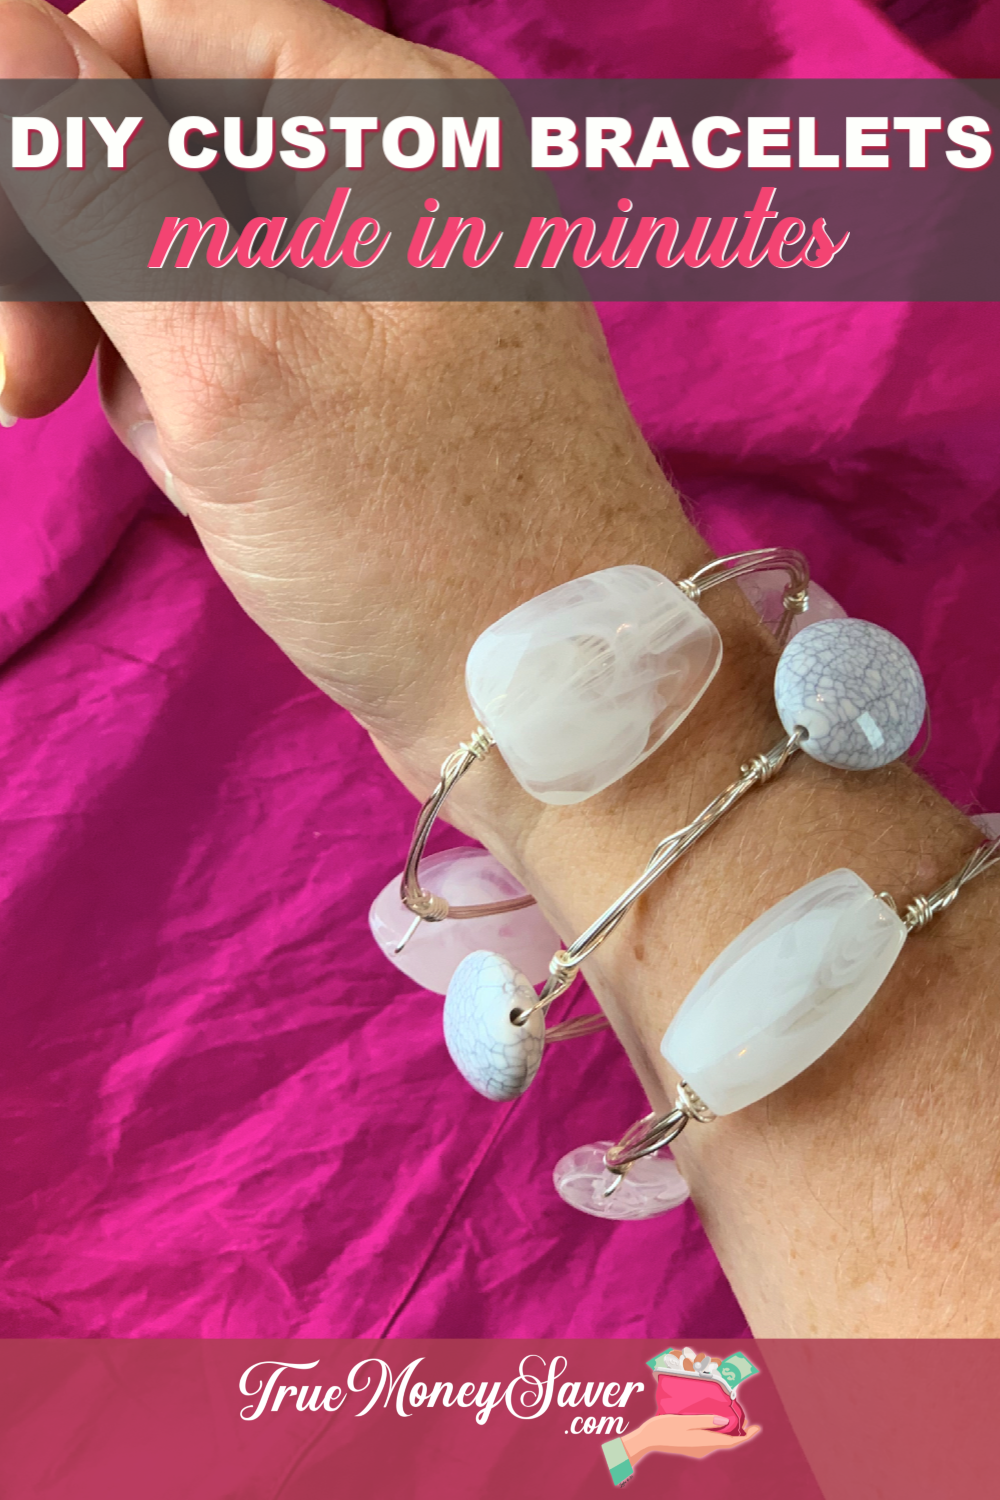
Recently, I was purchasing something for my husband online when this ad popped up for these beautiful stone bracelets. I couldn't believe how pretty they were and then I checked the price. WOW, they are expensive! And even worse, they look funny alone, so you really need to buy multiple ones to stack them. That can get quite costly if you were going to give them as a gift. 
Of course, I had to look at all the styles they offered when it struck me…they are just wrapped with wire! I can do that!
So I did a little digging in my craft closet and a little creating and figured out how to make a wire wrapped bracelet. You won't believe how easy it is! If you can tie your shoe, you can learn how to make a wire wrapped bracelet!
This DIY wire wrapped bracelet is not only really easy to make, but it's super cheap too! You could make approximately 10 easy wire wrapped bracelets for the amount of just one brand name bracelet! I kid you not!
And since you can make these so easily, you can turn it into a gift the same day! Gotta love that!
This post is part of our 30 Days of Homemade Gifts Series. 30 gifts that are easy (and cheap) to make, but also something you’ll be proud to give.
Each Homemade Gift has to meet 5 stipulations in order to maximize your money and make it easy for a busy mom to do:
- Easy to obtain supplies – Supplies are things you might already have on hand or are easy to find at Walmart or a craft store so you can get them in the same day you want to make it.
- Easy to make – Supplies are easy to work with or use so that anyone could do it… not caustic… so you could do the craft with your kids.
- Quick to make – It can be made in 30 minutes or less so it’s possible to make this gift in the middle of the night with products you most likely already have on hand.
- Cheap to make – You should be able to make the project without spending more than $10.
- Substantial – Each gift is “big” enough that you’ll feel confident giving it alone and not having to add a gift card to it.
BONUSES:
Multiple uses – Multiple gifts can be made out of the same supplies giving you options to use up all the supplies you buy.
Saving Money Double Bonus: Try to think about what you already have on hand to upcycled and save more money.
So are you ready to learn how to make a custom bracelet? Let's start wire wrapping!

Custom Bracelet Supplies:
- 20 Guage Wire (get the kind that is for wire wrapping projects) – $2.40 (40% Off @ $3.99 up to $6.99) for 4 yards (144 feet) of wire = 3 bracelets @ 3.5 feet used = 80¢ per 3.5 feet used
- Needlenose Pliers (there are some that will also cut wire too) – ($6.99 @ Hobby Lobby)
- Beads – sizes medium to large: White & Clear Acrylic Bead Mix – $4 ($7.99 @ 50% Off) (approx. 26 large beads per pkg. = 15¢ per bead) The Pink Acrylic Bead Mix or Blue & Green Acrylic Bead Mix are the same price.
- Ruler or measuring tape
- Cup big enough to shape your diy wire wrapped bracelet into a good circle.
There are several places to look for these types of beads that will work well for these easy wire wrapped bracelets. Look in the bulk beads that are grouped in containers and then also look for the larger sized beads in the jewelry making section.
Don't forget to use your coupon or wait for the supplies to go on sale for your DIY wire wrapped bracelet. At Hobby Lobby, the jewelry making supplies go on sale 50% off every other week so don't miss out. I always check the sale flyer on Sunday to see what's on sale. Then I set a reminder on my phone to head to the store before the sale ends.
BONUS FREE DOWNLOAD
Save Money On Your Craft Supplies
Download this FREE Guide to find 25 Ways to save money when you buy craft supplies so that your beautiful creations cost less.
Save Money On Your Craft Supplies
Download this FREE Guide to find 25 Ways to save money when you buy craft supplies so that your beautiful creations cost less.

How To Make A Wire Wrapped Bracelet Directions:
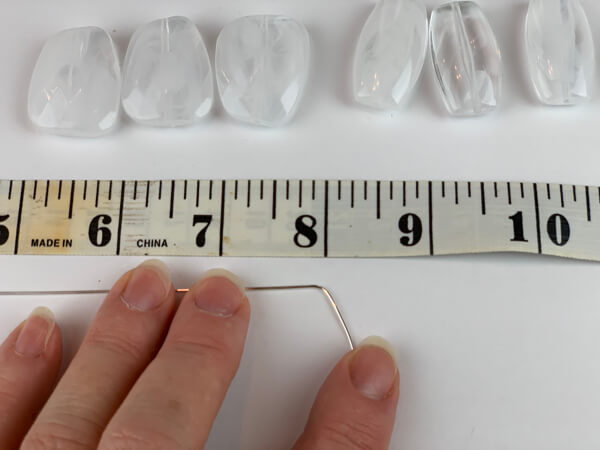
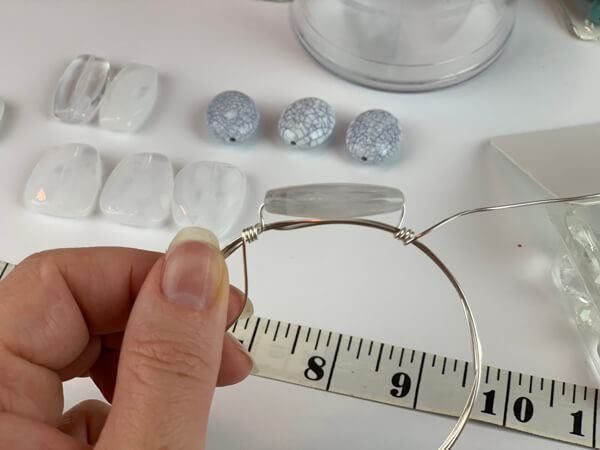
Step 1: Measure Wire Length
First, measure out 42 inches with your wire or ruler, then cut the wire off the spool. This is all you will need for your custom bracelet.
Then, measure 10 inches from the beginning of one side. This is where you will start your DIY wire wrapped bracelet.
You may not know the random fact that I worked in a major Jewelry chain inside the mall while I was in college. The standard size for a bangle to fit over your wrist is 8″.
That means the easiest way to get an 8″ bracelet is to mark the 10″ mark first, then mark three 8″ sections by putting a slight pinch in the wire so you can find it in the next step.
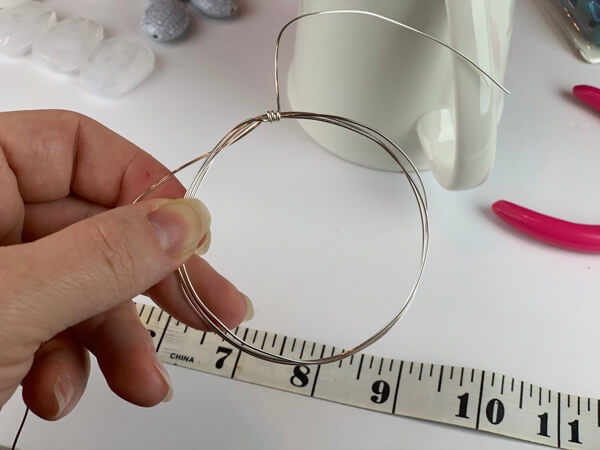
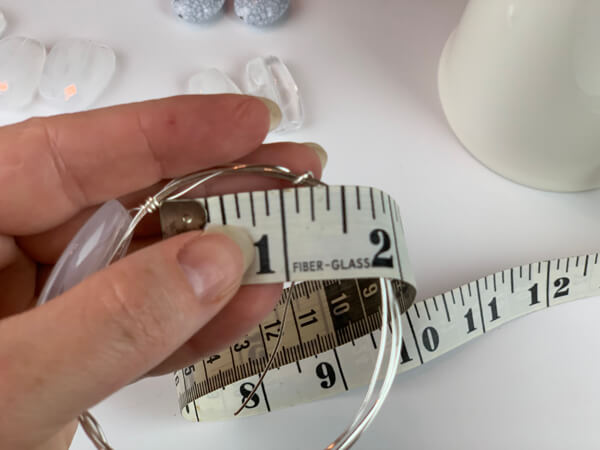
Step 2: Measure For Your Custom Bracelet
Starting from the 10 inch mark, line up the 8″ marks with each other. This will make an 8″ bracelet when finished.
Holding tight to the wire, smoosh it on your cup to straighten out the wires. My original clear cup was too big. I had to switch to a glass mug instead.

Once you have mastered how to make a wire wrapped bracelet, you'll be able to make them in no time at all!
Step 3: Wrap To Secure
Hold the wire where both loose ends meet along with the other strands and carefully slide the wire off the cup.
Using your hand, or the pliers, wrap one free wire around all the other strands 3 times to create the first knot and the start of your custom bracelet.
This easy wire wrapped bracelet is gonna look great!
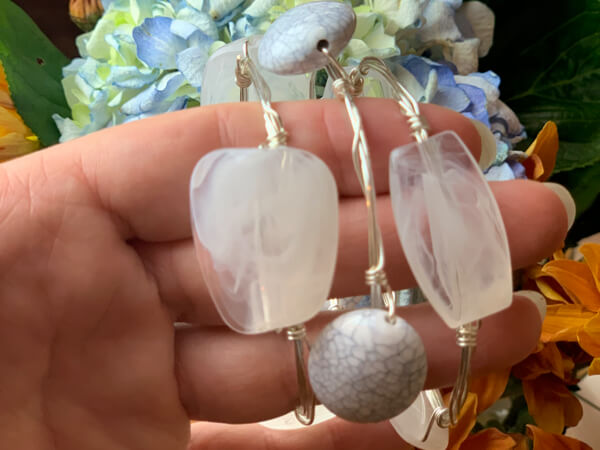
Step 4: Add First Bead
Slide one bead onto the free end of the wire you just wrapped around the bracelet. Push the bead near the wrapped knot you just made on your custom bracelet.
It's tempting to want to push the bead as close to the knot as possible, but that will make the bead go off center at the other end, so be sure you are a little generous on that first side. Now, wrap the free wire that the bead is on around the strands 3 times to secure it in place.
Next, on to the next bead for this DIY wire wrapped bracelet!
Step 5: Add Second & Third Bead
Pull the leftover wire you were just using and fold it over to the right to add the second bead to your custom bracelet.
Again, wrap the wire around the strands 3 times.
Then, add your last bead and wrap the end of the strands 3 times. You can continue wrapping the rest of the wire, or cut it and try to tuck it in so it won't scratch anyone's arm when worn..
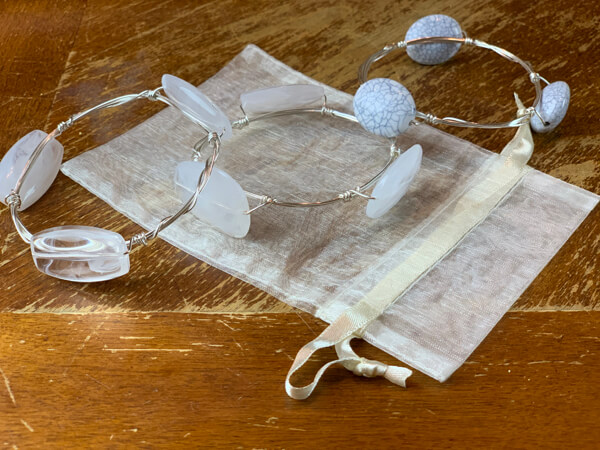
Make More Custom Bracelets!
While I love the large beads in these beads mix, I was troubled by what to do with the other smaller beads. Since I've only included the amount of the larger beads in the total cost, the smaller beads are basically free!
Go ahead and more some more DIY wire wrapped bracelets with the smaller beads! Since all the girls and ladies on your gift list will love these bracelets, they will sure love having sevearl matching wire wrapped bracelets!
Just think about what you could give these for!
- Mother's Day
- Bridesmaids Gifts
- Bridal Shower Gifts
- Birthday Gifts
- Mother & Daughters Matching Bracelets
- Teacher & Sunday School Teacher Gifts
The gift ideas are endless!
BONUS FREE DOWNLOAD
Save Money On Your Craft Supplies
Download this FREE Guide to find 25 Ways to save money when you buy craft supplies so that your beautiful creations cost less.
Save Money On Your Craft Supplies
Download this FREE Guide to find 25 Ways to save money when you buy craft supplies so that your beautiful creations cost less.
What Does This Custom Bracelet Cost?
- 20 Guage Wire (get the kind that is for wire wrapping projects) – $2.40 (40% Off @ $3.99 up to $6.99) for 4 yards (144 feet) of wire = 3 bracelets @ 3.5 feet used = 80¢ per 3.5 feet used
- Needlenose Pliers (there are some that will also cut wire too) – ($6.99 @ Hobby Lobby)
- Beads – sizes medium to large: White & Clear Acrylic Bead Mix – $4 ($7.99 @ 50% Off) (approx. 26 large beads per pkg. = 15¢ per bead) The Pink Acrylic Bead Mix or Blue & Green Acrylic Bead Mix are the same price.
- Ruler or measuring tape
- Cup big enough to shape your diy wire wrapped bracelet into a good circle.
Total Cost: $1.25 per bracelet (3.5′ of wire and 3 large beads) Most likely you would give 3 bracelets, costing a total of $3.75. Nice!!
Like I said earlier, if you can tie your shoe, you can learn how to make a wire wrapped bracelet because they are so easy to make!
Since these custom bracelets are super cheap too, you can make a bunch for everyone on your gift list this year. Now that's fun!
And since you can make these DIY wire wrapped bracelets so easily, you can turn it into a gift the same day! Yahoo!
YOUR TURN: What kind of beads are you going to add to your custom bracelets? Let me know in the comments below!