 Decorating your house can be an expensive endeavor this holiday season, but not with the cheapest Christmas decorations that you can DIY!
But with all of the fun Pinterest projects available, the more DIY projects you can make, the more money you will save.
I’ve found that a combination of shopping at the Dollar Store and knowing how to save when you shop at the Craft Store means you can decorate your house on the cheap.
Here are a few decorations I made for less than $6 total, plus loads of some of the Christmas decorations for the home on a budget that you can make!
Saving money at Christmas is a must and so is getting crafty! Now you can save money with these DIY ideas and still save money while getting your house in tip-top Christmas shape!
And with most of these ideas, you can get the kids involved and help out! That not only builds their creative minds, but it’s great quality family time too.
Plus, most of these are so easy to make that you’ll wish you had made them sooner.
Now all I need to add to my house is the Christmas Tree and I’ll be done decorating for Christmas!
So are you ready to make some of the cheapest Christmas decorations? Let’s get crafting!

Start & Shop With a Plan
Just like you know in order to save money you should not go to the grocery store hungry, you cannot go into JoAnn’s without a plan… honestly, I think going into JoAnn’s is like catching a glimpse of heaven.
But their job is to entice you to buy already made items, or talk you into buying a bunch of lofty best-intention projects that you will never get to accomplish.
BONUS FREE DOWNLOAD
Save Money On Your Craft Supplies
Download this FREE Guide to find 25 Ways to save money when you buy craft supplies so that your beautiful creations cost less.
Save Money On Your Craft Supplies
Download this FREE Guide to find 25 Ways to save money when you buy craft supplies so that your beautiful creations cost less.
If you’re going to make the cheapest Christmas decorations, you have to stick to your plan of saving money!
How To Save On The Cheapest Christmas Decorations
Shopping at the Dollar Store is easy, there are things to stay away from and things you should only buy there. But shopping at Craft Stores is slightly more strategic.
Since NOW is the Holiday season, JoAnn’s and Michael’s both will have fantastic sales to get you to “deck the halls” with everything Christmasy. You need to stay focused on your couponing principles of combining great sales, along with excellent coupons so your wallet doesn’t get away from you and you spend more than you should’ve.
Both JoAnn’s and Michael’s typically put coupons out in a flyer found in the Sunday Newspaper, or you can also sign up for their emails and get on their mailing list in order for them to send you coupons directly to your mailbox.
And don’t forget their app! That usually has a coupon or two that could save you up to 60% Off!

Ornament Vase Centerpiece
This project took longer to shop for than it did to put together! In about 10 minutes you will have a magical, glowing, Christmas centerpiece.
I got all the supplies at the Dollar Tree or JoAnn’s (or you could find it at Michael’s) and had a great time putting it together with my kids! Check out the Step-by-Step instructions to make the Christmas Centerpiece here.
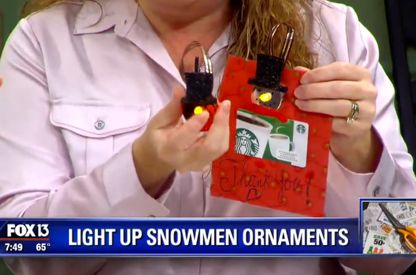
Light Up Snowman Gift Ornaments
Okay, when Annabelle said she wanted to make these, I honestly thought they sounded kinda cheesy… but when she showed me that they light up… well, anything that you can hang on the tree that lights up, I tend to like.
So for this craft, you only need a sheet of felt to make the hat and or some kind of hat sticker, add eyes and pair it with a gift card for Sunday School Teachers or School Teachers. And they make for some of the cheapest Christmas decorations around that your family will love!
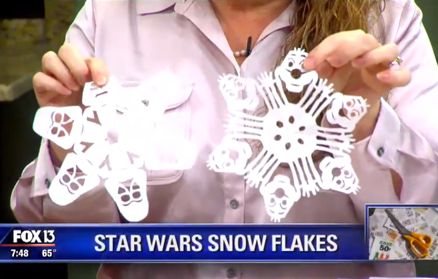
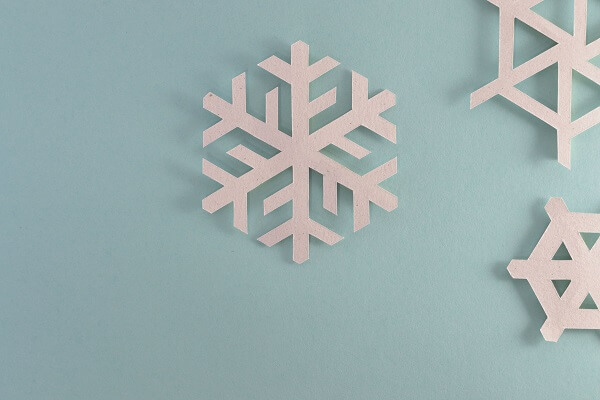
Paper Snow Flakes
This is a SUPER FUN project to do with the kids… although, it might be more for older kids and have the younger kids make slightly easier ones because this one requires the use of a Xacto knife.
It is essentially cutting up a piece of paper into the shape of a snowflake that has the Star Wars and Frozen and Guardian of the Galaxy characters on them. it is SO COOL and my boys totally approved that it is super neat… oh and the patterns are totally FREE!
Download Star Wars Snowflakes Templates HERE
Other Uses For Paper Snowflakes:
- Using a tension curtain rod, hang some snowflakes in your windows for a winter scene effect
- Lay down a solid color dining tablecloth, then lay a bunch of paper snowflakes on top. Protect them with a clear table cover over the top of them. Then hang more snowflakes from your dining room light or ceiling creating a winter wonderland.
- Create a snowflake art display by hanging a bare branch on the wall or ceiling. Then, hang a grouping of snowflakes from the branch with fishing line.
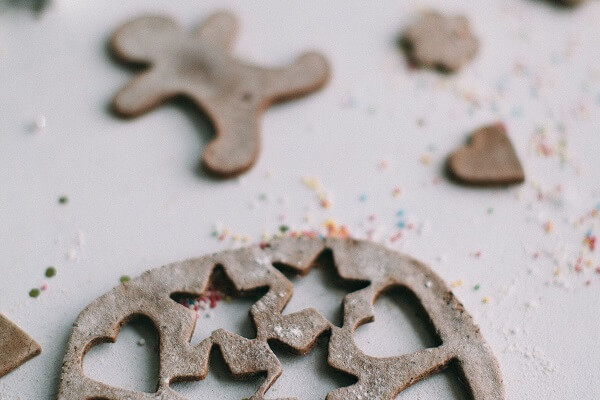
Salt Dough Ornaments & Garland
This salt dough recipe is a great way to keep the kids busy and out of your hair if you’re trying to bake or even wrap up some presents in private.These truly rank as one of the cheapest Christmas decorations you can ever make!
Salt Dough Supplies:
- 2 cups Flour
- 1 cup Salt
- 1/2 cup Water
- 1 tsp. Cream of Tartar (optional)
- 6 Tbsp. Cinnamon (optional for extra fall smells)
- Rolling pin
- Assorted Christmas cookie cutters (or butter knife for cutting shapes)
- Parchment paper/wax paper
- String/Twine/Yarn
- Drinking straw (to make the hole for hanging)
Additional Supplies:
- Paint
- Glitter
- Paintbrushes
- Other Christmas decorations to add to the shapes likes glue and pom-poms, sequins, etc.
Salt Dough Directions:
Combine 2 cups of flour, 1 cup of salt and approximately half a cup of water.
Some recipes require a teaspoon of Cream of Tartar, but this is optional. (If you have it on hand, great; if not, don’t worry about running out to the store to buy it.)
Mix the ingredients together well and use a rolling pin to make the dough flat. Flatten approximately to 1/2″ thick.
Use your Christmas cookie cutters to cut out shapes. You could also freehand your creation with a butter knife or use printed shapes and a knife if you don’t have cookie cutters.
Salt Dough Ideas:
Salt Dough Ornaments: Poke a little hole in the top while the dough is raw with the straw. This will be used for hanging.
Salt Dough Garland: If you are going to use the shapes for a garland, make sure to put two holes on either side of the shape for stringing through twine, yarn or string.
After poking the holes for stringing, set the shapes on wax paper or parchment paper and let it air dry for a few days (flipping it over several times). You can also place the shapes on a cookie sheet and bake at 150* until golden brown and completely dry for 1-2 hours. Time and duration will depend on the thickness and size of the ornaments.
Once they are dry, have fun painting your easy DIY Christmas decoration crafts and hang them up when you are finished.

Hot Glue Snowflakes
If you can use a glue gun, you can make these pretty snowflakes! This is how to make cheap DIY Christmas decorations with just your glue gun and some glitter glue sticks!
Note: If you have OCD or are a perfectionist – this is NOT the project for you. This is a more of a not-so-perfect snowflake looking project!
Also, you must lay the glue down then add the glitter. Once you have added the glitter, the glue doesn’t want to stick to itself.
Caution: A glue gun can get very hot. Only have an adult use the glue gun. Kids can help with the glitter!
Supplies:
- Hot glue gun
- Hot glue sticks or Hot glue glitter sticks
- Tape
- Parchment Paper
- Paper towel
- Scissors
- Printed snowflake designs (find some on google images)
- Glitter (also needed craft glue, paintbrush)
BONUS FREE DOWNLOAD
Save Money On Your Craft Supplies
Download this FREE Guide to find 25 Ways to save money when you buy craft supplies so that your beautiful creations cost less.
Save Money On Your Craft Supplies
Download this FREE Guide to find 25 Ways to save money when you buy craft supplies so that your beautiful creations cost less.
- Start by printing several images of some printed snowflake designs. If the lines are not strong enough lines to see underneath the wax paper, you may need to trace over the lines with a bold black marker. Note: Strong bold lines with fewer intricacies are better.
- Cut off a piece of parchment paper and tape down the corners to your table, making sure the paper is taught and slide the snowflake design underneath. If you are going to add glitter to your snowflakes, you may want to do several of these designs and have them set up as the glitter will take time to dry.
- Warm up your glue gun on low temp and follow the pattern of the snowflake design. Don’t worry about the glue strings. You can trim them when they are dry.
- Now while the hot glue is still wet do you want to add your glitter. They will not only need to dry but you will need to add a coat of regular craft glue to seal the glitter to the snowflake. Or you will continue getting glitter everywhere because the glitter does not sink into the glue and stay!
- Once the snowflakes have dried, cut off the glue strings and make the edges of the snowflakes neat and even.
- To attach the snowflakes to the window, add a dot of hot glue to the back of the snowflake and then attach them to the window. To remove them later, you will just need to scrape off the excess glue off the window with your fingernail.
- You can also hang the snowflakes in the window, on your tree or anywhere around the house with fishing line.
Wonderful Wrapping
One of the greatest things about Christmas wrapping paper is that it’s so cheap! It’s especially one of the cheapest Christmas decorations if you are using last years clearance Christmas paper! It makes for some great Christmas decorations for the home on a budget.
Don’t forget that Christmas is one of the items to wait and buy until the after Christmas sale!
Wrapping Paper – Option #1 Supplies:
- Christmas wrapping paper
- Scissors
- Tape
- Bow/Ribbon (optional)
Directions:
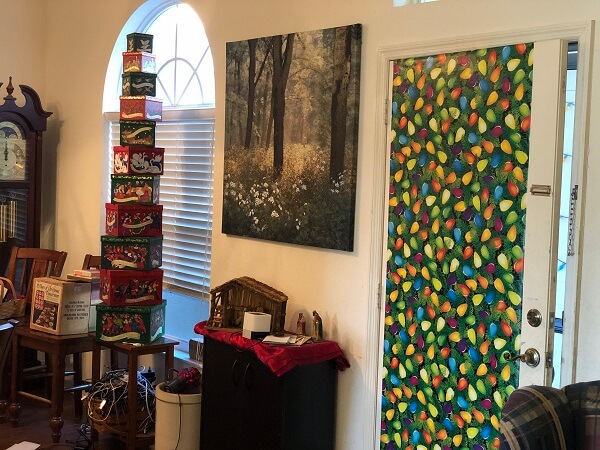
- Measure the width and length of your cabinet door enough to wrap onto the back of the door so you can tape it down.
- Cut a piece of wrapping paper to size. Using the tape, tape the paper to the backside of the door so you can’t see the tape.
- Add a bow or ribbon to the middle of the door to make it look like a present.
- You can also do this to any inside or outside door. You can do this to an outside door as long as the door doesn’t get wet.
Ribbon & Bow – Option #2 Supplies:
- Scissors
- Tape
- Wide Ribbon & Bow made from same ribbon (check out this bow tutorial)
Directions:
- Measure the length of the cabinet or door adding enough length to wrap the ribbon around to the back of the cabinet or door to tape.
- Tape the cut ribbon to the back of the door.
- Add the bow to the middle of the ribbon to the middle of the door.
Nature’s Blessings
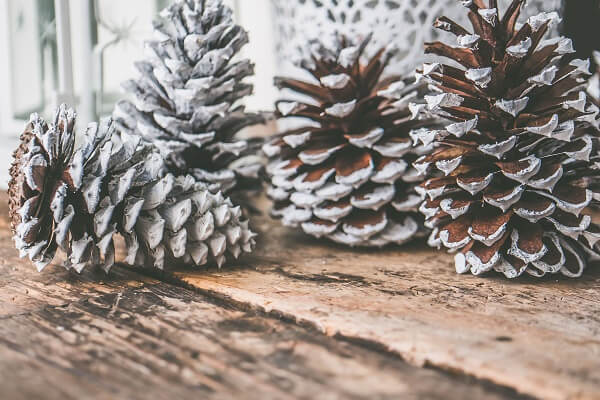
The greatest thing about going on a nature walk are the many freebies you can bring home for decorations! Pinecones and twigs make for some easy DIY Christmas decoration crafts for your home and great Christmas decorations for the home on a budget.
Supplies:
- Styrofoam floral rings, spheres or craft cones
- Hot glue gun
- Hot glue sticks
- Acorns, pine cones, twigs and fresh greenery (Bonus if you can find Mistletoe)
- Bow/Ribbon (optional)
- Paint & paintbrush (optional)
- Glass or Wood Salad Bowl
- LED Candle
- White spray paint
- Berry springs (from craft store)
Directions:
- Go on a nature walk and collect as many acorns, pine cones, twigs and fresh greenery as you can.
- Grab some Styrofoam floral rings, spheres or craft cones for the dollar store.
Nature’s Blessing Ideas:
Pine Cone Tree: Arrange and hot glue the acorns, pine cones, twigs and fresh greenery to form a tree.
Nature’s Wreath: Arrange and hot glue the acorns, pine cones, twigs, and fresh greenery to form a wreath. Add ribbon and a bow.
Nature’s Christmas Ball: Arrange and hot glue the greenery to form a Christmas ball. Add to a table centerpiece for texture.
Nature’s Candle Bowl: Add LED candle to the center of the bowl, then add pine cones and greenery. (If you happen to have or can find a hurricane vase, add that to the bowl first and add the candle inside. Then add the pine cones and greenery.)
Nature’s Snowflakes: Glue some twigs into the shape of snowflakes. Add a hanger and some greenery and a ribbon.
Nature’s Garland: Using floral wire or hot glue, add pine cones, acorns, and greenery to a long piece of twine. Hang on your tree or drape across your mantle.
Vase Arrangement: Spray paint some twigs and pine cones white. Hot glue some pine comes to the twigs making them look natural. Add them to the vase along with the berry sprigs. Add a ribbon and bow to the vase. (You could also add fake snow to the bottom of the inside of the vase to hide the bottom of the twigs.)
As you can see, the cheapest Christmas decorations are the ones you make from nature!
The Sweets You Can Eat & Craft With
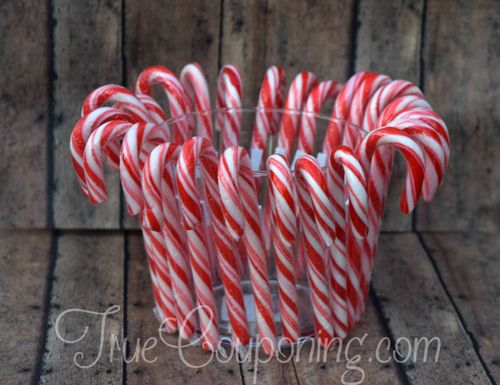
Not only are peppermints and candy canes they sweet, but they look so festive in some of the cheapest Christmas decorations you can make this year!
Get the directions to make the Candy Cane Centerpiece pictured above!
Supplies:
- Candy Canes
- Peppermints
- Pillar candles
- Ribbon/bow
- Scissors
- Hot glue
- Hot slue sticks
- Foam wreath
- Cardboard cone
Pillar Candle Candy Cane: Glue candy cane sticks around a pillar candle. Add a ribbon with a bow to finish off the look.
Candy Cane Wreath: Hot glue candy canes around in a circle to form a wreath. Make a bow with ribbon and hang on your door! Or you can even shape them into a star!
Peppermint Wreath: Glue wrapped peppermints to a foam wreath making sure you can’t see the wreath underneath. Add a ribbon and hang!
Striped Mints Tree: Hot glue striped mints onto a cardboard cone.

Twine – It’s So Fine (And Cheap!)
Twine is so cheap and it makes for a great rustic look. Plus, it makes for some easy DIY Christmas decoration crafts. Your kids will love them too!
Supplies:
- Twine
- Scissors
- Popsicle sticks, paint sticks or twigs
- Hot glue
- Hot glue sticks
- Scissors
- Ribbons, bows, jingle bells, greenery (optional)
- Cardboard 3″x3″
- Cardboard heart shape
- Fishing line
Twine Ideas:
Twine Trees: Hot glue some twigs or sticks into shapes of trees. Hot glue the end of the twine to the back side of the tree and wrap the twin around the tree covering the tree where the leaves would be hot glueing the twine in place as you go. Cut and hot glue the end so the twine is secure. Attach a piece of fishing line for hanging.
Twine Stars: Hot glue some twigs or sticks into the shape of a star. Hot glue the end of the twine to the backside of the star and wrap the twin around the star covering the entire star. Hot glue twin in place if you feel it’s not secure as you are wrapping around the star. Cut and hot glue the end so the twine is secure. Attach a piece of fishing line for hanging.
Twine Angel: Cut a piece of cardboard 3″x3″. Start wrapping your twine around the piece of cardboard around 10 times. Slide a piece of the fishing line under the twine and tie the twine together forming the head of the angle. Slide the twine off the cardboard and tie another piece of the fishing line below the head of the angel to form the body of the angel. Trim any ends. Tie a short piece of ribbon or copper wire to form the wings.
Twine Hearts: Cut a piece of cardboard into a heart shape. Hot glue the start of the twine and wrap the twine all around the cardboard covering all of the cardboard so it can’t be seen. Cut and secure the end with hot glue in an inconspicuous spot. Cut a small piece of twine or fishing line and hot glue for a hanger.
Twine Shapes Garland: Grab one long piece of twine and add these shapes plus a colorful ribbon to form one great twine garland!
Add any ribbons, bows, jingle bells or greenery to finish off your twine shapes! These are great Christmas decorations for the home on a budget.

Cupcake Liner Cuties
Cupcake liners come in so many colors, patterns and now even in metallic colors! Let’s grab our craft supplies for some of the cheapest Christmas decorations!
How to make cheap DIY Christmas decorations is buy using those supplies you got on clearance last year! Talk about cheap!
Supplies:
- Twine
- Cupcake liners (assorted colors and patterns)
- Hot glue
- Hot glue sticks
- Scissors
- Ribbons, bows, jingle bells, greenery (optional)
- Foam tree shape
- Foam wreath form
- Pins
- Fishing line
- Stapler & staples
- Wood Circles – at least 1″
- Assorted Markers
- Metallic Pipe Cleaner or Iridescent Tinsel Stem (for angel halo)
Cupcake Liner Ideas:
Cupcake Liner Trees: Grab an assortment of Christmasy cupcake liners and cut out the bottom so all you have is the ruffle. Hot glue the ruffles to a foam tree. Make the tree all one color or mix it up. Add any ribbon, greeenery or other decorations to finish your tree!
Cupcake Liner Angels: Take a 1″ wood circle and draw a face on the circle with markers. Take two different colors of cupcake liners, cut them both in half, then take one half of each liner and cut it in half again. Then, take the one full half of the cupcake liner and fold it in half, so that each side shows the color or printed side of the liner. Glue the point of the liner to the back of the circle (this makes the body of the angel so make sure it is placed correctly). Then take the two quarter liner pieces and glue the points to the wood circle (these make the wings). Cut the pipe cleaner in half and shape a halo with one end and glue the other end to the back of the wood circle. Make a hanger out of the fishing line and you have an angel!
Cupcake Liner Garland: Grab one long piece of twine. Then count out ten liners and fold each one in half with the printed side facing inward. Glue each non-printed half side together forming a ball, making sure that as you glue the last set together, you add it to the twine. Depending on how long you want your garland to be, continue adding the liner balls to the garland about 5-6 inches apart. Add any other decorations you want to your festive garland!
Cupcake Liner Box Topper Or Bows: Get an assortment of cupcake liners (about 10-15) and separate them and crinkle the edges a little so they won’t stick together. Then add them on top of each other. Put a staple in the middle of them, then fold the liners in half. With scissors, make 4-6 cuts down from the top edge towards the center fold (do not cut all the way to the fold). Open up the liners and fluff all the layers so they stick out. Add this cupcake liner bow to the top of your package with double-stick tape.
Cupcake Liner Snowflakes: Fold one cupcake liner in half three times. Make several cuts from the edges of the liner. Open up for a fun and cute snowflake design!
Cupcake Liner Wreath: Grab an assortment of Christmasy cupcake liners and a foam wreath form. Take a cupcake liner, turn it so the print is facing inward and put a pin in the middle of the liner and add it to the foam wreath. You could also hot glue the liners to the wreath as well. Crumple up the edges a little bit so that the liner looks more ruffly and not uniform. Add more liners till the wreath form is full and fluffy. Add some ribbon for hanging the wreath, a bow, and anything else that will make this cupcake liner wreath extra Christmasy!
Book Beauties
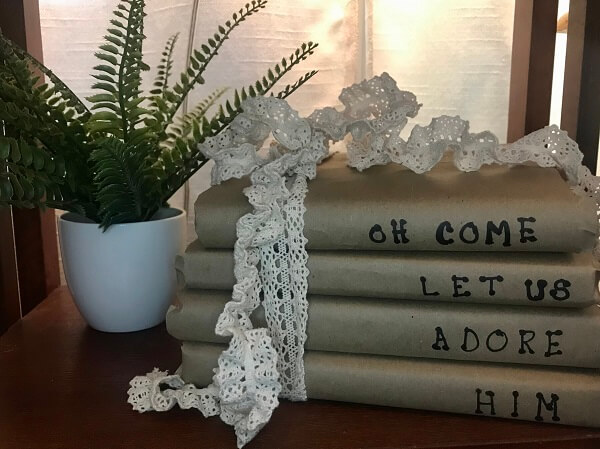
If you have some old books that are NOT worth anything, then you can definitely make some beautiful and some of the cheapest Christmas decorations this year!
Or, head to your local thrift store for some deals. The more “vintage” and discolored the better!
Supplies:
- Books
- Scissors
- Decorative Edge Scissors
- Glue or double stick tape
- Glitter glue (optional)
- Fishing line or twine
- Sheet Music
- Foam Tree Shape
- Hot Glue
- Hot Glue Sticks
- Stamps
- Ink
- White or brown kraft paper
- Twine
- Ribbons, bows, jingle bells, greenery (optional)
Book Ideas:
Nostalgic Book Groupings: First, come up with several sayings, Christmas carol titles or Santa’s Reindeer names that you love. Wrap the book covers with the white or brown kraft paper (like you used to cover your school books). With your stamps and ink, stamp the names of your sayings or Christmas Carols on the bindings of the books. Add twine to group them together. Add another greenery or ribbon. Then, add them to a display or add an LED candle to the top.
Book Trees: Take the cover off the book and count out 30 pages. Cut these pages apart from the rest of the book. You will need two sections of 30 pages to complete a tree. Starting with the first section of pages, fold the top corner down to the center fold. Fold in the right side fold that you just made and line it up with the glued spine. Then cut off the bottom that hangs off the edge of the pages from the folds you just made or just fold it under the last fold. Do this step to each of the pages on both sets of pages. Glue the two sets of pages together forming a tree. Add glitter or anything else to make these book trees great!
Sheet Music Trees: Cut the sheet music into 2″ strips. Then cut the strip into fringe about 1/2″ wide fringe into the strip – not cutting all the way through. Roll the strips up longways so that the fringe is rolled upon itself. Then, hot glue the strips onto the trees, making sure the fringe is hanging out from the tree. Fluff the fringe when you are done.
Page Ornaments: Take a page from a book and fold it accordion style. Fold the accordion in half and then cut the ends into a curve. Repeat this step on a second page. Tie both pages together in the center. Glue the two pages together where they meet to form a circle.
Printed Garland: Cut shapes out of the pages like hearts, stars or any other Christmas shapes. Use your Christmas cookie cutters for easy tracing! Staple, tape or glue the shapes to a long piece of twine. Hang and love this easy garland!
Have some more book pages to use? Then you’ll love this Layered Christmas Tree!
These have turned out to be some of the best Christmas decorations for the home on a budget!

Christmasy Coffee Filters
If you have some coffee filters hanging around, you can make some very festive and cheap Christmas decorations! Although, these make great bows for any time of the year!
Or head to the dollar store for a pack for a buck! Either way, you make them, these crafts are going to look great!
Supplies:
- Hot glue
- Hot glue sticks
- Scissors
- Foam 8″ ball shape
- Foam tree shape
- Fishing line
- Needle
- Coffee filters
- Pencil
Coffee Filter Ideas:
Coffee Filter Trees: With scissors, cut out the bottom of the coffee filters. Fold and glue the edges to the foam tree as you go, repeating all the way up to the top of the tree. Use one complete filter forming it over the very top of the tree. Or, you can add a star or any other decoration to top off the top of the tree.
Hanging SnowBalls: First, add a hanging string to your snowball before starting. Then, to a pencil eraser, form the coffee filter around the eraser, add a dab of hot glue and add the filter to the snowball. Repeat till the snowball is full and finished. You can use smaller balls, but you will need to use cupcake liners as the coffee filters are too large for them.
BONUS FREE DOWNLOAD
Save Money On Your Craft Supplies
Download this FREE Guide to find 25 Ways to save money when you buy craft supplies so that your beautiful creations cost less.
Save Money On Your Craft Supplies
Download this FREE Guide to find 25 Ways to save money when you buy craft supplies so that your beautiful creations cost less.
Coffee Filter Gift Bow: Did you run out of bows for your packages? Take about 5-10 coffee filters and fold them into quarters, unfold and them fluff the edges a little. Take one filter, open it up and form the filter over your pointy finger. Add a dab of hot glue (carefully!) and add the next filter. Repeat till all of the filters are glued together. Take the bottom where it was formed on your finger and squish together forming a point and then fold that point over to the side. Tape the bow to your package and fluff!
Love flowers during the holidays? Make some of these beautiful coffee filter flowers to add to a display!
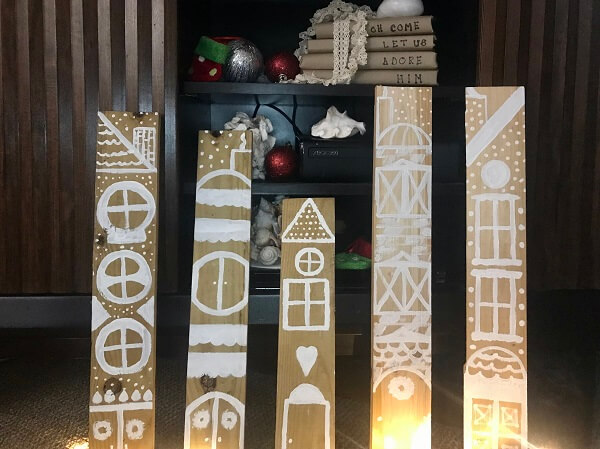
Scrap Wood Delights
If you have some old coffee filters hanging around, you can make some very festive and cheap Christmas decorations! Or head to the dollar store for a pack for a buck! Either way, you make them, these crafts are going to look great!
Supplies:
- Scrap wood 2″x4″ (or other scrap wood sizes)
- 4″x4″ blocks
- White Paint
- Paintbrushes
- Sandpaper
- Other colors of paint to your liking
Wood Ideas:
Gingerbread Houses: Cut your 2″x4″ to your desired heights and form a peak at one end with a scroll saw or miter saw. Use sandpaper to make the wood smooth. Paint the 2″x4″ into gingerbread houses. If your wood is very light, you may want to use a light stain so the wood looks more like gingerbread. Use your imagination to paint windows, doors and beautiful decorations on the houses with white or colored paint.
Simple Wood Trees: From a 2″x4″ or 1″x4″, cut simple triangle shapes to form trees. The size of the trees depends on how big you want them to be. Of course, you can get more involved and cut out tree shapes with a scroll saw, but simple triangles work great too. Smooth out the wood with sandpaper. Then paint your simple trees in the colors you want. You could also add white dots to your trees to resemble snow. Decorate and paint till your heart’s content!
Christmas Present Blocks: Cut a scrap 4″x4″ to the size you want it to be. Paint and tie with a ribbon or bow to be a simple present!
Simple Wood Ornaments: Think of words or Christmas sayings you want to add to these ornaments. Using stencils, figure out how long you want your ornaments to be and cut a 1″x4″ to length. Smooth out any rough edges with sandpaper. Drill two holes near the top of the ornament for hanging on opposite sides. Stain or paint the ornament, then add your saying with stencils Add ribbon or wire for hanging.
Snowman Shorties: From a 2″x4″ or 1″x4″, cut simple rectangle shapes. The size of the snowman depends on how big you want them to be. For better painting, smooth out the wood with sandpaper. Then paint your snowman white. Then add black dots for the eyes, smile, and buttons, and add an orange carrot triangle nose. You can even add the names of your family members to each snowman.
So as you can see, saving money at Christmas is a must but so is getting crafty! With these DIY Christmas ideas, you can still save money and get your house in tip-top Christmas shape!
And most of these ideas, the kids can get involved and help out making the house all Christmasy! This not only builds their creative minds but it can become quality family time too.
Plus, most of these are so easy to make that you’ll wish you had made them sooner.
Your Turn: Which of the cheapest Christmas decorations are you going to make this year? Share with me below!

More Fun Articles To Read: